Setup - Statement Generation
This tab allows the user to set the defaults for the statement generation process. We strongly recommend that you not use this feature, when you generate PostalOne! payment (original ready to pay or ready to pay), you have the ability to generate quick statement. Also, if you are utilizing PWDD, you are able to quickly access and email a PostalOne! statement to a customer.
If Only Create Release Files is selected in the PostalOne! tab, you will not see a Statement Generation tab.
Please discuss with our Support team, if you think you need to create statements using Statement Generation, there are some customers who need this, but most of our customers do not.
To access the Setup screen, from DAT-MAIL main menu go to File > Program Settings > Program Setup, then click on the Statement Generation tab.
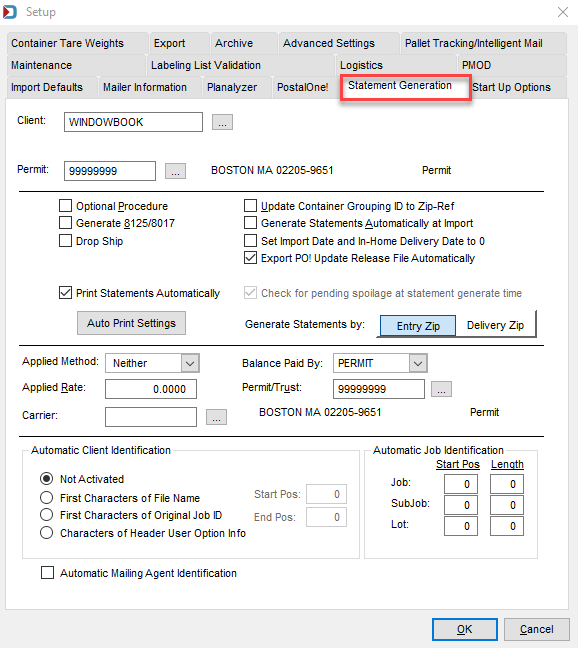
Client & Permit: Enter defaults for Automatic Statement Generation. The default Client will be used during automatic statement generation in conjunction with our single file import process, if the Generate Statements Automatically at Import checkbox is selected in the Import Defaults tab.
Optional Procedure: Select this checkbox if the bulk of your mailings are verified under an Optional Procedure (OP) agreement. At the time your statements are to be generated, you can choose to deselect this checkbox if the mailing is not part of your OP agreement.
Generate 8125/8017: Select this checkbox to automatically generate 8125s or 8017 with the postage statement.
Drop Ship: This controls whether or not a Consolidated statement will be generated for your drop ship mailings. If this option is checked, it will generate a consolidated statement. This setting can be overridden at the time of statement generation from a single file import or through automatic statement generation from a single file import.
Update Container Grouping-ID to Zip-Ref: This option will populate the Zip-Ref in the CSM Container Grouping ID field. It will update your Group 1 Batch Code or Postalsoft Entry Point Number to the Zip Reference field of the statement. When you print a 3602-RV, the Zip-Reference number can print in each statement section.
Generate Statements Automatically on Import - This turns on the feature that allows you to generate statements automatically after the Mail.dat import is complete. This feature can be used when you do not need to make any changes to your Mail.dat in relation to entry facility.
Set Import Date and In-Home Delivery Date to 0: If you are generating your statements automatically upon import and do not want them to have either mail dates or in-home dates, enable this option. When statements are created, the rate table used will be based on your computer's system date. When the mailing actually takes place you can change the postage statement's date. This way it is easy to tell the difference between statements for mailings still in production vs. statements that have actually mailed.
Export PO! Update Release File Automatically: If you generate an update release, this will allow the program to automatically export it for upload to PostalOne!.
Check for pending spoilage at statement generate time: This option allows for the program to work with the IM Scan Manager (Automation Scheduler Plug-In) to automatically check for a spoilage file and apply the spoilage prior to generating a statement. This will be done only when a statement is set to generate.
Applied Postage Information: These defaults will be used if you are creating a statement with affixed postage but can be changed if you are not using the Generate Statements Automatically on Import feature.
Applied Method: If you select Neither, you can enter the applied rate. This rate should be equal or lower than the lowest postage rate being mailed. If Lowest is selected this automatically applies the postage for each entry point at the lowest postage rate used by each entry point. If not all entry points are being mailed at the same rates and you are applying the postage at the same rate for all entry points, it is best to select Neither and enter that rate. The Correct option automatically applies the piece rate that is applicable.
Balance Paid By: If you have applied the postage at a Neither or Lowest Rate, there will be postage due for the mailing. You must select a payment method for this balance. If you select "Permit" or "Trust", you must also select the Permit/Trust account that is being used.
Applied Rate: If the applied method is Neither, this is where you set the postage amount being metered on the piece.
Permit/Trust: Permit should be selected if the balance is paid by a permit. According to DMM regulations you must also create a 3600-R, 3602-R or 3602-N for this “additional postage”. If you do not do this and are using the Postage Accounting program, this postage usage will not be allocated to the job. If you do not create these extra statements, then you are really using your permit as a trust account and should choose Trust instead. Selecting Trust still requires you to select a permit but you do not have to create an additional postage statement for the balance due.
You also have additional options:
-
Meter: If you are applying a meter strip on the postage statement to pay for the balance due, select this.
-
Stamps: If you are applying stamps on the postage statement to pay for the balance due, select this.
-
Check: If you have an arrangement where you are directly paying the balance due by check, select this option. If you are expecting a value added refund however, this will be the selection to make since the overpayment is not applied to a permit or trust account.
Automatic Client Identification and Automatic Mailing Agent Identification: If in the Daemon Auto tab of Import Defaults has Generate Statements Automatically at Import checkbox selected, then these options can be selected.
Automatic Client Identification: Radio button choices are shown below:
-
Not Activated: (Default) turns the option off. When any of the other three radio button options are selected the feature is considered and parses the Client code from the three possible sources (File Name, original job id, or HDR: User Option field).
-
First Characters of File Name: This is the name of the Mail.dat itself (for example, datjob.hdr) and you must enter the end position.
-
First Characters of Original Job ID: (Job Number) If using this option, you must enter the end position.
-
Characters of Header User Option Info: The HDR User Option field, which is available for additional detail about jobs, is 1,227 characters long, so you must enter the start and end positions.
Automatic Mailing Agent Information When this checkbox is selected, during Mail.dat import the Company will be derived from the SEG Verification Facilty Zip field in the first Segment record. This zip is compared against all zips in your Mailing Agent file and if a match is found then that Company is the one used during statement generation.
Automatic Job Identification: DAT-MAIL has statement generation options which can create separate statements for each Job, Version (lot) and payment type (Permit, Meter and Stamps) and tie them to a single consolidated statement for each payment type that can serve as a commingled statement. To setup the parsing, you must define how the MPU Description is parsed. Enter the info on the Job, SubJob (Hagen users only) and the Lot (usually referred to by mailers as package, copy or version). If the mailer is not adding a SubJob to the Job, this can be left empty. Below is an example.
When we import this information, the SubJob is added to the end of the Job number and the two are separated with a dash. For instance: Job 1234 / SubJob 001 / Version 001 will be represented as Job 1234-001-001.
The parsing information to enter looks like this:
Job: Start 1, Length 4
SubJob: Start 5, Length 3
Version: Start 9, Length 3
Return to DAT-MAIL - Program Setup