Advanced Navigator - File > Export Mail.dat File
If you need to send a Mail.dat to a logistics Company, for example, after making changes to a job, this is the function to use.
-
In the Advanced Navigator, select File > Export Mail.Dat File.
Advanced Navigator File Menu 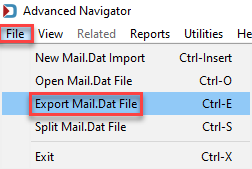
-
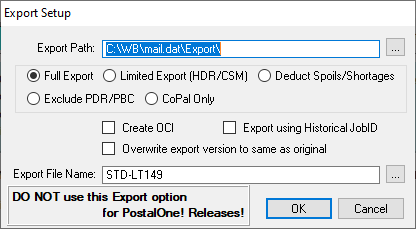
The Export Setup window will display. Set the Export Path and Export File Name if it needs to change, and click OK.
An explanation of the Export Setup options is located below in Export Setup Window.
Export Setup Window
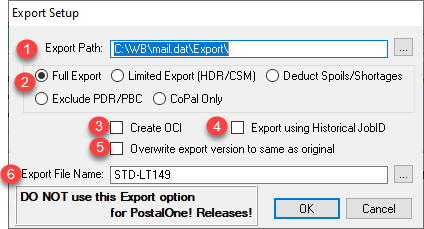
Below the print screen is an explanation:
![]() Export Path: Click Browse to select a folder to export the Mail.dat.
Export Path: Click Browse to select a folder to export the Mail.dat.
You can set a default Export Path in Program Settings > Program Setup. In the Setup screen, click on Export tab to set the Default Export Directory in the Mail.dat Export Settings section.
![]() Types of Export:
Types of Export:
-
Full Export: Exports all the files that make up the Mail.dat you imported.
-
Limited Export (HDR/CSM): Exports the Header and Container Summary records.
-
Deducts Spoils/Shortages: We recommend using "W - Wasted Piece, PostalOne!! will adjust," and "S - Shortage PostalOne!! will adjust" to avoid PostalOne! errors to avoid PostalOne! errors. The Deduct Spoils/Shortages option will only work if you use "X - Wasted Piece, DM will adjust," and "T – Shortage, DM will adjust." Then DM will adjust and must have the Remove spoiled pieces from export checkbox selected in the Export tab of the program Setup screen. When pieces are marked as spoiled or short, the pieces will be eliminated from the Piece Detail (PDR), or Piece Barcode (PBC) records if either of these files was imported. It will also change the piece count in the CSM, Container Quantity records (CQT), and Package Quantity records (PQT).
-
Exclude PDR/PBC: If you are sending a file to a logistics Company, they may ask you to exclude these files to reduce the size of the Mail.dat and eliminate files they do not need.
![]() Create OCI: If the job does not have Original Container ID (OCI) records and there is a reason to send it to someone, this will generate the file.
Create OCI: If the job does not have Original Container ID (OCI) records and there is a reason to send it to someone, this will generate the file.
![]() Export using Historical JobID: When the job is exported, it will change the Job ID to what was in the Historical Job ID field.
Export using Historical JobID: When the job is exported, it will change the Job ID to what was in the Historical Job ID field.
![]() Overwrite export version to same as original: If you have a Mail.dat that was version 19-1, for example, and DAT-MAIL converts it to 21-1 during import, by selecting this checkbox, you can export it as a 19-1 Mail.dat version.
Overwrite export version to same as original: If you have a Mail.dat that was version 19-1, for example, and DAT-MAIL converts it to 21-1 during import, by selecting this checkbox, you can export it as a 19-1 Mail.dat version.
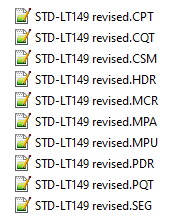
![]() Export File Name: It will default to the current file name, but you can change it to another name and the name of the individual files that make up the Mail.dat file will change to that name. For example, if you changed STD-149 to STD-149 revised. When you look at the files they have STD-149 revised.
Export File Name: It will default to the current file name, but you can change it to another name and the name of the individual files that make up the Mail.dat file will change to that name. For example, if you changed STD-149 to STD-149 revised. When you look at the files they have STD-149 revised.
Return to Advanced Navigator - File Menu