Defining the Input File
A name/address file or IMbs only can be provided for 1-PASS Prep (1PP) to process. Most of the time, users will be using a name/address file, but some comminglers will ask customers to send them a list of only IMbs that are going into the commingle, this is an option in 1PP. If using a name/address file, it must be CASS™ processed and include IMbs or delivery point ZIP Codes. If using a name/address file, either provide the Intelligent Mail Piece Barcodes (IMB’s) or let 1PP create them. The input file can be a delimited or fixed field length text file.
CASS and NCOALink can be run at the same time, please request more information from Client Services.
Required Fields
Input files must have the following fields mapped for 1PP to work:
-
Piece_IMB_Text (see below, if using 1PP to create the IMB, there are other combinations of values to use 1PP.)
Provide ZIP_CODE, Plus4, and Delivery Point; OR use Zip_9 and Delivery Point; OR use Zip_11, in place of the Piece_IMB_Text.
If you only have an input file with the Delivery Point Barcode, 1PP strips out the check digit, so this can be mapped as the Delivery Point field.
Whether creating a sort scheme for a commingler only or creating a commingler sort scheme and a presort scheme, you will want to have in your input file whatever fields are necessary for production. The other fields in an input file can be assigned to any non-system user defined field name which can also be used as the same field name in the output file. If you are interested in splitting out 5 digit (5D) qualified mail for a presort program, the following fields need to be mapped in both input and the output files. Except, when the input consists of the IMbs only.
-
First_Name
-
Last_Name
-
Firm_Name
-
Address_1
-
Address_2
-
City
-
State
See User Defined Header Fields to keep your existing heading names, instead of using 1PP required field names for the headings. For example, 1PP uses Plus4, but in your data it is referred to as ZIP4.
Defining the File Name and Type
The Input File format is defined by the parameter line that starts with Input_File. The Format_File options are ‘Delimited’ and ‘Fixed’. The file name is declared in the next line in the File_Name element. The use of “./” indicates the directory where the 1PP program is installed.
-
Input File – either delimited or fixed format input files are supported.
-
Delimited – when using a delimited file, you must also define a delimiter. Almost any value could be used. The most common are comma (‘,’), pipe (‘|’) and tab.
-
Fixed File – when using a fixed file, you will be defining the start position of each field and the field length.
-
File Name – file names of the parameter file, input file and output file.
Example of comma delimited input file:
<Input_File File_Format='Delimited' Delimiter=',' Record_Type='Input'>
<File_Name>./Test_Data.csv</File_Name>
Defining File Layouts
You must define the contents of your file and use specific field names for fields required by 1PP. You can also specify other fields that you can pass through to the output file(s).
Delimited File Layouts
The Field Name tag name defines the field and for a delimited file a column number specifies that absolute position in the file. You can also use a ‘+1’ column value to specify a relative position. The relative position option allows you to insert new columns without having to revise column numbers. You have the option to include the Header attribute if the file you are importing has a header record and you wish to skip over it. The fields should be in the same order as your input file.
This shows the Header attribute and defines input file layout based on relative positions by using ‘+1’. This is not a complete example of an input file, just a sampling. See Required Fields, above, for more details.
Example of Header attribute
<Input_File File_Format='Delimited' Delimiter=',' Record_Type='Input' Header='true' >
<File_Name>./Job1_with_imbs.csv</File_Name>
    <Field Name='recordid' Column='+1' />
    <Field Name='name' Column='+1' />
    <Field Name='firm' Column='+1' />
</Input_File>
Here is an example of the same delimited file with absolute positions defined. Again, this is not a complete example of an input file, just a sampling. See Required Fields, above, for more details.
Example of the above delimited file with absolute positions:
<File_Name>./Job1_with_imbs.csv</File_Name>
    <Field Name='recordid' Column='1' />
    <Field Name='name' Column='2' />
    <Field Name='firm' Column='3' />
</Input_File>
User Defined Header Fields
Input file parameters can be set to define heading names, instead of using 1PP required field names as the header names on output.
In the example, the IMBs are not present, so the following three fields are being mapped as the required fields: 5 digit ZIP; Plus4; and the Delivery Point. The field names are “ZIP_Code”, “Plus4” and “Delivery_Point”. However, the user prefers to see them as “OUT_ZIP5”, OUT_ZIP4” and “OUT_DELIVERYPOINT.
Example with User Defined Fields:
<Field Name="ZIP_Code" Header_Name="OUT_ZIP5"  Column = "+1" />
<Field Name="Plus4" Header_Name="OUT_ZIP4"  Column = "+1" />
<Field Name="Delivery_Point" Header_Name="OUT_DELIVERYPOINT"  Column = "+1" />
Fixed Length File Layouts
For a fixed length file, you must define a starting position and length. You must specify the absolute position of the start of the field then use the Length label to define the length of the field. The Field Type label defines the type of field and 1PP can support Text, Floating Point, Integer or Boolean. However, fields 1PP uses are always Text fields.
Here is an example of a Fixed File with the Header attribute and Implied Decimals is supported for numeric fields. This is not a complete example of an input file, just a sampling. See Required Fields, above, for more details.
Example of Header attribute with Implied Decimals
<Input_File_Format=’Fixed’,’Record_Type=’Input’,’Header=’true’>
<File_Name>./Job1withimbs.txt</File_Name>
     <Field Name=’Full_Name’ Column=’30’ Length=’66’ Field Type=’Text’ Implied_Decimals=’2’ />
</Input_File>
Using Load Files
Load_Files are used to provide a list of facilities or sort schemes, their production sequence and their minimum weights or pieces. This table is not required unless you want to either manage what mail is being diverted to the presort program based on entry point and/or you want to define your output order.
It is used for two purposes:
-
Restricting the 5D mail to pieces that are serviced by specific entry facilities. For example, you may only drop ship to facilities close to you. By defining these drop ship facilities in the Load File, only pieces that both qualify for a 5D discount and are serviced by those facilities will be directed to the output file you will run through your presort program. When USPS drop ship facilities are added to the Load File, any 5D pieces not serviced by those facilities will be commingled.
-
Set the sequence of your output files. Normally the output sequence of a commingle file will be in scheme order. Entering the scheme numbers in the Load File allows you to set the output sequence. If USPS Entry Facilities are also defined, the sequence of the output file that will be processed by your presort program will match the sequence they were listed in the Load File.
Creating and Using a Load File
The load file defines the entry points and entry point minimums used to determine if and when to create an output file with 5D pieces that can then be run through a presort program.
-
Record_Type - should be set as ‘Load_def’.
-
Load_Destination_Type - refers to SCF, NDC, DDU or EXT for a sort scheme. The “EXT” represents an external sort scheme defined in a sort_scheme table.
-
Load_Destination- refers to 3 or 5 digit labeling list or sort scheme ID.
-
Load_Name - is an optional field; it is where you can put the name of the entry point or scheme.
-
Load_Min_Pieces - is an optional field; it set the minimum pieces for an entry point or scheme.
-
Load_Min_Weight - is an optional field; it sets the minimum weight in pounds for an entry point or scheme.
Example Load File format
<Load_File File_Format='Delimited' Delimiter=',' Record_Type='Load_def' Header='true' >
  <File_Name>./loads.csv</File_Name>
    <Field Name='Load_Destination_Type' Column='1' />
    <Field Name='Load_Destination' Column='+1' />
    <Field Name='Load_Name' Column='+1' />
    <Field Name='Load_Min_Pieces' Column='+1' />
    <Field Name='Load_Min_Weight' Column='+1' />
</Load_File>
The format is usually a comma delimited CSV file such as the one below:
‘Load_Min_Pieces’ and ‘Load_Min_Weight’ apply to each destination within a load, not the load as a whole.
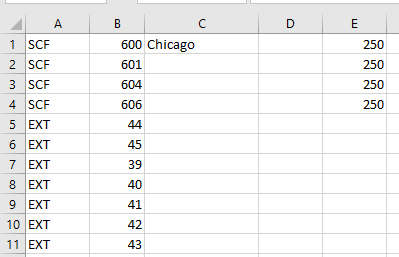
In the example above, only mail that would qualify to go to SCF’s with labeling list ZIPS of 600, 601, 604 or 606 will be diverted to the presort program, but only when there is at least 250 pounds of mail to one of these SCF’s.
The “EXT” represents an external sort scheme defined in a commingler’s sort_scheme table, this is used when changing the order of the output.
Continue Defining the Output Files
See also