DAT-MAIL & AWAM Setup - Scan2Pay
Scan2Pay Setup in DAT-MAIL
Before you can use the Scan2Pay function and to pay postage via AWAM, the functions must be enabled in DAT-MAIL.
-
When Scan2Pay is not enabled in DAT-MAIL, the Scan2Pay tab will not display in wbSCAN’s Activate Pallets screen.
In this image, Scan2Pay is already activated.

-
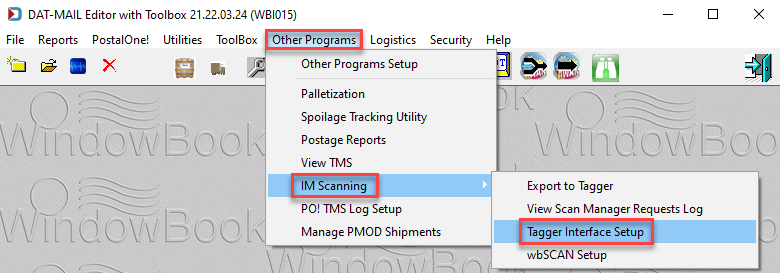
From DAT-MAIL’s main screen, select Other Programs > IM Scanning, then Tagger Interface Setup to enable Scan2Pay.
-
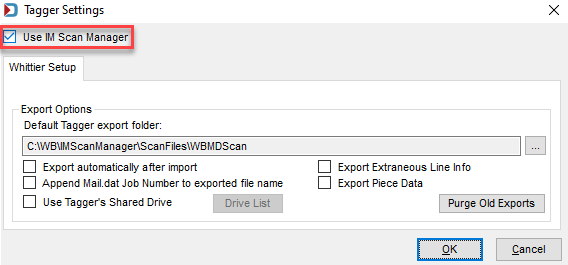
The Tagger Settings screen will display. Select the Use IM Scan Manager checkbox. Click OK to save the changes and close the screen.
Any time you make changes to wbSCAN settings, the Window Book wbScan Service (via Windows Services) must be stopped and then restarted before the changes will take effect.
-
Next, from DAT-MAIL’s main screen, select Other Programs > IM Scanning > wbSCAN Setup.

-
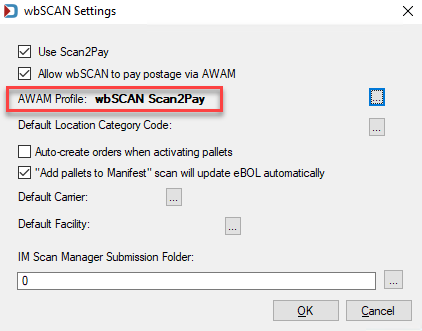
The wbSCAN Settings screen will display. Select the Use Scan2Pay checkbox.
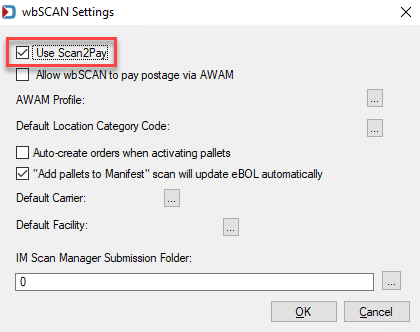
If you are not using AWAM, the setup is complete for wbSCAN Scan2Pay. Click OK to exit the wbSCAN Settings window. Otherwise, continue below.
Scan2Pay Setup in AWAM
This procedure assumes AWAM is already registered and activated in DAT-MAIL.
-
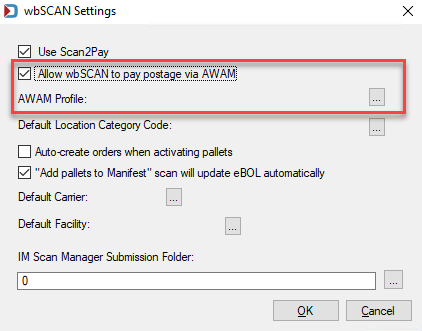
If you choose to automate wbSCAN pay postage using AWAM, you will need to create a post-processing profile. Click Browse in the wbSCAN Settings screen to insert the profile.
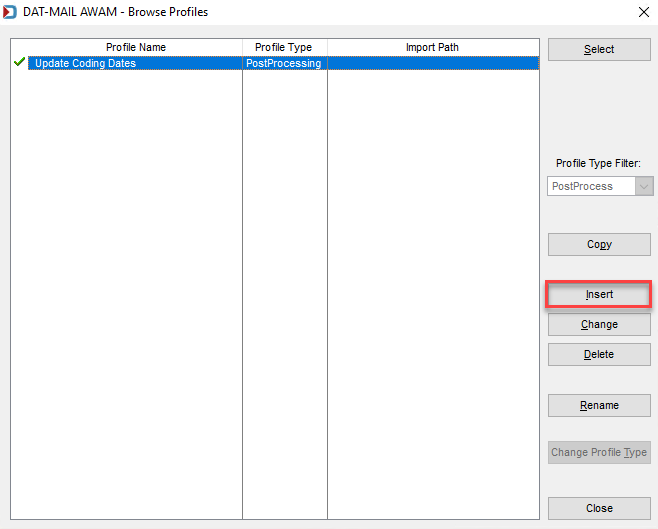
The DAT-MAIL AWAM Browse Profiles screen will display. Under Profile Type Filter, use the drop-down to select Post Processing, then click Insert to create a new profile.
-
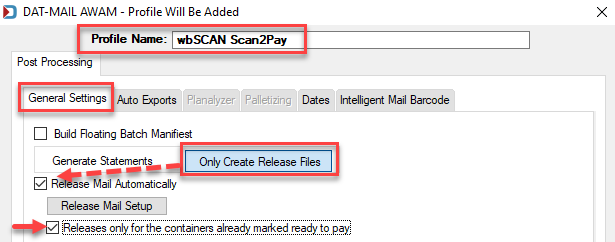
Once a new profile screen launches, enter a Profile Name. Enter a name that easily identifies the profile’s purpose (such as “wbSCAN Scan2Pay”).
General Settings tab:
-
Determine whether statements should be generated (select Generate Statements option) or if the system should only create release files (select Only Create Release Files option).
-
If you selected generate statements, select the Generate Statements Automaticallycheckbox. And if you selected Only Create Release Files, select Release Mail Automatically checkbox.
-
Perform the Statement Setup or Release Mail Setup (depending on which option was enabled, click the appropriate, corresponding button (you can print statements or quick statements) automatically.
-
Again, depending on which option you initially choose, select either the Generate Statements only for that contains already marked ready to pay checkbox or the Release only for the containers already marked ready to pay checkbox.
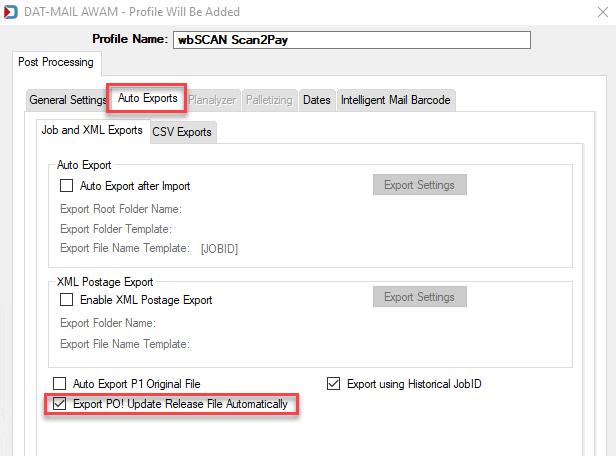
Auto Exports tab:
-
Select Export PO! Update Release File Automatically checkbox.
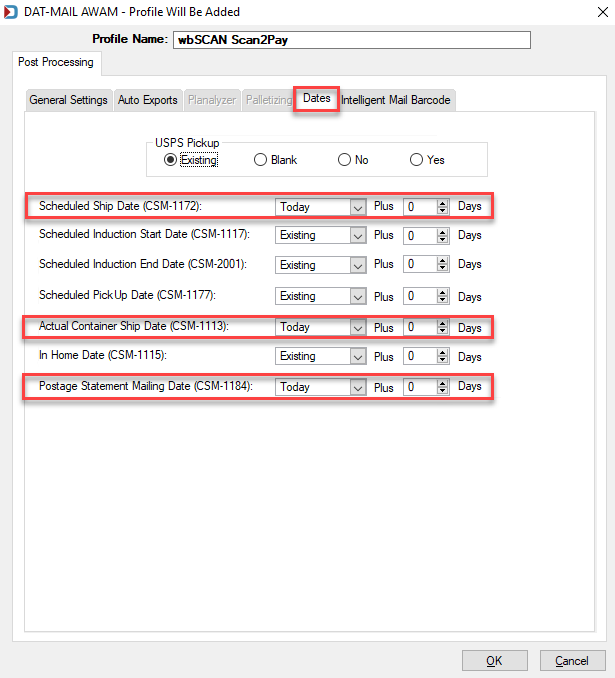
Dates tab:
-
Use the options in the Dates tab to update the dates in the Mail.dat file to reflect the scan date as the ship date or payment date. The Scheduled Ship Date, Actual Container Date, and Postage Statement Mailing Date should be set to Today.
-
When finished, click OK to save and close the new AWAM post-process profile. The DAT-MAIL AWAM – Browse Profiles screen will display. Highlight the newly created post-process profile and click Activate & Select.

The DAT-MAIL AWAM – Browse Profiles screen will close, and the wbSCAN Settings screen will display. The name of the newly created/selected AWAM Profile will show. Click OK to close the screen. There are other options on this screen that you may benefit from using. Review the various Other Component Setup Requirements/Options to see how you can fully utilize wbSCAN and simplify scanning, such as adding a default carrier.
Fully automating the Scan2Pay process requires the automatic upload of Mail.dat files to PostalOne!.
Continue PostalWeb Connector (PWC) - Fully Automate Scan2Pay.