Printing Tags
To print sibling tags, perform the following:
-
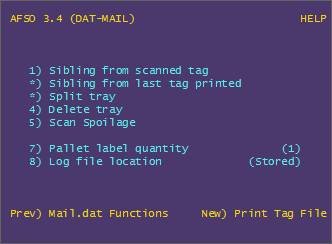
From the AFSO 3.4 (DAT-MAIL) screen select 1 for Sibling from Scanned Tag in order to scan the tray that has ‘overflowed’ which the new sibling tray tag will be associated with.
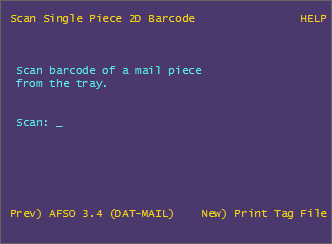
The Scan Single Piece to 2D Barcode screen will display, which prompts you to scan the tray tag:
-
Aim your scanner/imager at the tray tag and pull the trigger. The 24-digit Intelligent Tray Barcode will appear on the screen briefly and a new tag will be printed; and
Note: We do not recommend the use of triggerless scanners since they can decode tray tags at times that the Tagger is not on the scan barcode screen. This would be the same as pressing 24 keys on the Tagger when in other menus resulting in unpredictable actions like reprinting tags for the entire job.
-
Place the new tag in the sleeve of the new overflow tray.
If you are printing tags one at a time in-line with production and you can see that the mail that is supposed to go into a specific tray will not fit, you can use the 2nd option listed on the AFSO 3.4 (DAT-MAIL) screen, specifically “Sibling from last tag printed”. No scanner is needed in that case:
-
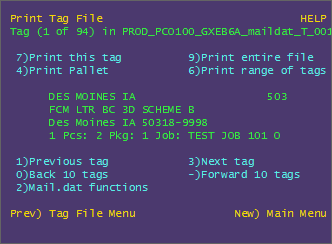
When using in-line tag printing, select 7 (Print This Tag) to print each tag while in the Tagger's Print Tag File screen.
-
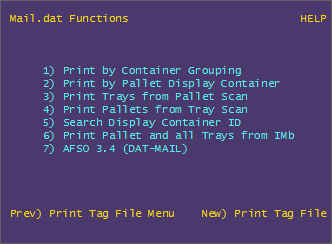
To print the sibling, from the Print Tag File screen select 2 for Mail.dat Functions.
-
From the Tagger's Mail.dat Functions screen, select 7 for AFSO 3.4 (DAT-MAIL).
-
From the Tagger's AFSO 3.4 (DAT-MAIL) screen, select 2 for Siblings From Last Tag Printed.
-
Splitting a Tray
This process is nearly identical to printing sibling tags. To split a tray, perform the following:
-
To retrieve the Mail.dat for the job you are working on, select 2 from the Main Menu screen to display the Get Tag File screen, then select 7 to display the List Files screen and select the job.
-
From the Print Tag File screen, select 2 to display the Mail.dat Functions screen.
-
From the Tagger's Mail.dat Functions screen, select 7 for AFSO 3.4 (DAT-MAIL).
-
From the Tagger’s AFSO 3.4 (DAT-MAIL) screen, select 3 for Split Tray.
-
Scan the tray tag of the tray that you are splitting.
-
Move the pieces that would have been in the back of the original tray to the new tray, then pull out the first piece of mail in the new tray and scan it with your 2D barcode imager. The new tray tag will print and you should immediately put it into the sleeve of the new tray.
Reprinting Tray Tags by Scanning a Piece Barcode
If you have a 2D USB scanner like the Honeywell 1900 and can generate piece data for the Tagger (see setup instructions), you can reprint missing or damaged tray tags by just scanning the mail piece.
Go to the Tagger's AFSO 3.4 (DAT-MAIL) screen and select option 4 for “Reprint tray tag from IMb scan”. You can scan any piece of mail in the tray and the replacement tag will be printed. No guessing! This feature has other uses as well. For instance: if pieces fall out of a tray, you can figure out which tray they belong in by using this feature and discarding the tags that are printed.
This feature only works on jobs that have been assigned unique piece barcodes - though the individual pieces do not need to qualify for the Full Service discount. They can be non-auto pieces and still allow the program to reprint the correct tray tag! Full Service jobs will always meet this requirement but many non-Full Service jobs may also meet it if the mail pieces have unique barcodes and the Mail.dats created include single piece data.
Selecting a Tray from an IMb Scan
If you are doing “in-line” tray tag printing as trays are produced, one challenge you may have is figuring out where the production run is starting in the Mail.dat when a job is split up across multiple production line. You can easily find the first tray in the production run by simply choosing option 5 “Select Tray from IMb Scan” from the Tagger's AFSO 3.4 (DAT-MAIL) screen and use your handheld imager/scanner to scan the IMb on the first mail piece produced. It will take you to the Tagger's Print Tag File screen with that tray displayed. Just press the 7 key to print the tray tag and advanced to the next tray! You can also use this feature to locate the tray for any piece of mail without having to print a tray tag.
Deleting Trays
Mailers can remove a tray from a mailing using the DELETE TRAY function in the Tagger. This may be helpful if a tray is not mailed because of shortages or is pulled or withdrawn from the mailing for other reasons. Once a tray is deleted from a mailing it can not be “un-deleted” so extreme caution should be used if this function is used. Trays must be deleted prior to a ready-to-pay update being exported or the tray will not be deleted.
When DAT-MAIL sees that the Tagger has deleted a tray, it will remove that tray from any exports sent to PostalOne! if none had been created. If an original file was uploaded to PostalOne!, DAT-MAIL will create a special update to delete these trays when the mailer creates a ready-to-pay update, but mailers must be careful to upload the deletion submission prior to the ready-to-pay submission. The deletion submission will have a lower submission serial number in its file name. User’s of Window Book’s eDocs Manager will not have to worry about this since it will automatically upload these updates in the correct sequence and wait for the first submission to finish processing before submitting the second update.
Scanning Sibling Tags Created by the Tagger’s “On Demand” Mode
This method requires no interface between the Tagger and DAT-MAIL. The mailer connects a USB scanner to the computer that runs DAT-MAIL and scans sibling tags previously generated by Tagger’s On-Demand mode. This approach has some drawbacks:
-
The computer needs to be near where the sibling tags are printed and placed into trays in order to conveniently scan them.
-
The user must manually enter the tray level and destination ZIP into the Tagger. Sometimes more information like Carrier Route is needed. Manual data entry can lead to errors. Neither of the other methods of creating siblings requires data entry.
The user can scan these tags into the job that is opened by pressing the Generate Siblings on DAT-MAIL's Advanced Navigator screen, then scanning the sibling tags. If the user gets an error, it means that either they did not create the tag with a tray level and destination ZIP Code present in the job, or they either entered the info incorrectly into the Tagger or are scanning the tags into the wrong job.
See also