Connecting to the Tagger Built-in File Server from a Windows PC
Set Up the Network Configuration on the Tagger
To be able to use the Tagger’s built-in file server from a Windows PC begins with the set up of the network configuration on the Tagger itself.
-
From the Tagger’s Main Menu screen, select 6 for System Settings.

-
From the Tagger's System Setting screen, select 5 for Network Settings.
-
From the Tagger's Network Setting screen, select 5 for TCP/IP Settings.
-
Select 1 for Connect and select Wired option.
-
Select 2 for Source. Depending if your network has a DHCP server or not, pick the appropriate choice for either DHCP or STATIC IP (this example uses STATIC IP).
-
Select 3 to enter Tagger IP (our example will use a STATIC IP OF 192.168.10.161 for the Tagger). Make sure that the PC/server is configured to use the IP subnet addressing.
Make sure that the PC/server is configured to use the same IP subnet addressing. a subnet of 255.255.255.0.
-
Select 4 to enter the Subnet Mask (this example uses 255.255.255.0).
-
Select 7 to Apply the settings.
Configure the Windows Folder Share Settings on the Tagger
To configure the Windows folder share settings, perform the following:
-
From the Tagger's Main Menu screen, select 6 for System Settings.
-
From the Tagger's System Settings screen, select 5 for Network Settings.
-
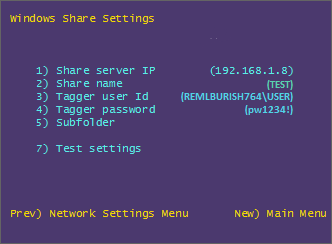
From the Tagger's Network Settings screen, select 2 for Windows Share Settings.
-
From the Tagger's Window Share Setting screen, select 1 to enter the Share Server IP (example: 192.168.10.161).
-
Select 2 to enter the shared folder name (example used above: Data).
-
Select 3 to enter the Tagger's user ID of (example used above: BTUSER). This is the user ID required for accessing the Tagger’s built in file server.
-
Select 4 to enter the Tagger's password (example used above: BT1user). This is the password required for accessing the Tagger’s built in file server. Keep in mind, the password is case sensitive.
Map a Network Drive on the PC/Server to the Tagger’s File Share
The following set up instructions were performed on a PC/Server with a Windows 7 operating system (OS). Screen layouts and menu options may vary if the set up is being performed on a PC/server that has an OS other than Windows 7. Please refer to your local IT Administrator with any questions.
To map a network drive to the Tagger’s file share, perform the following:
-
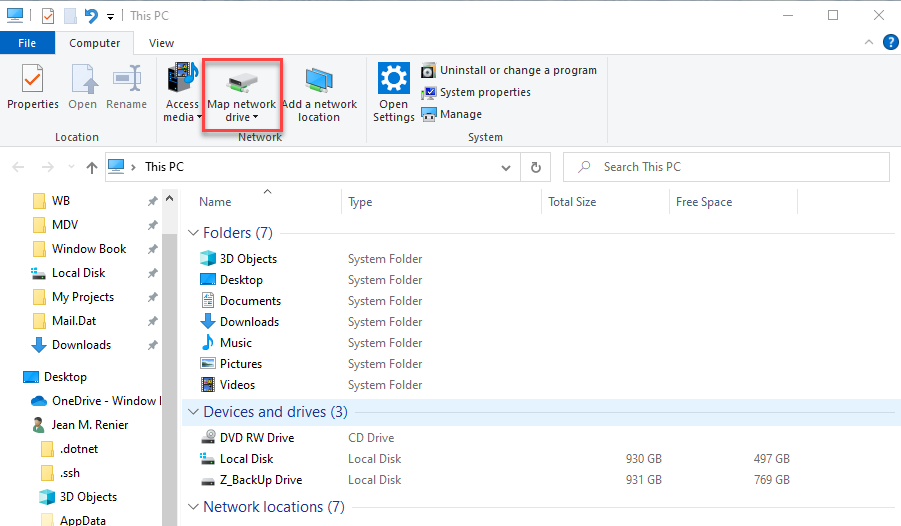
From the PC/server’s desktop, double click This PC to open it.
-
Single click the option to Map Network Drive.
-
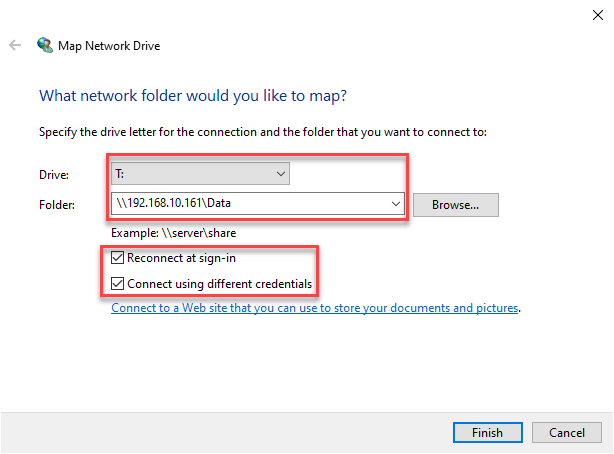
A Map Network Drive window will display. Select an available drive letter (this example uses T:).
-
In the same Map Network Drive window enter the complete folder path, including the IP address (for example, "\\192.168.10.161\Data").
-
In the same Map Network Drive window select the Reconnect at sign-in checkbox to automatically reconnect to the Tagger's file share every time you log on to the PC/server.
-
Also, select the Connect Using Different Credentials checkbox if your PC/server is configured for a domain/work-group.
-
Click Finish. If you selected Connect Using Different Credentials an authentications dialog will display in order to be able to access the file share.
-
When the Enter network credentials window appears, for the Username enter BTUSER. For the Password enter BT1user
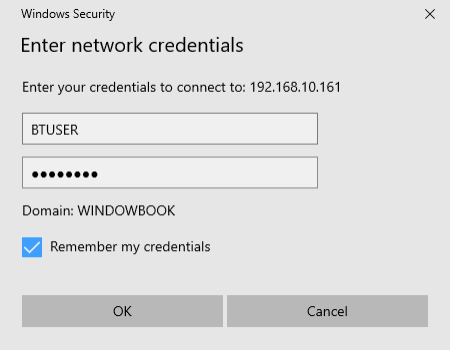
Select the Remember my credentials if you don’t wish to have to renter the user name and password each time you access the folder
-
Click OK.
If everything was configured correctly, you will see the Tagger's file share display and you can view the contents of the folder. If you cannot access the Tagger’s built-in file share verify that the IP configuration is correct and/or check for any typos - especially password credentials (which are case sensitive) (refer to Step 4 above).
See also