Description of Split Utility View
Before actually performing a split, we recommend you become familiar with all the options.

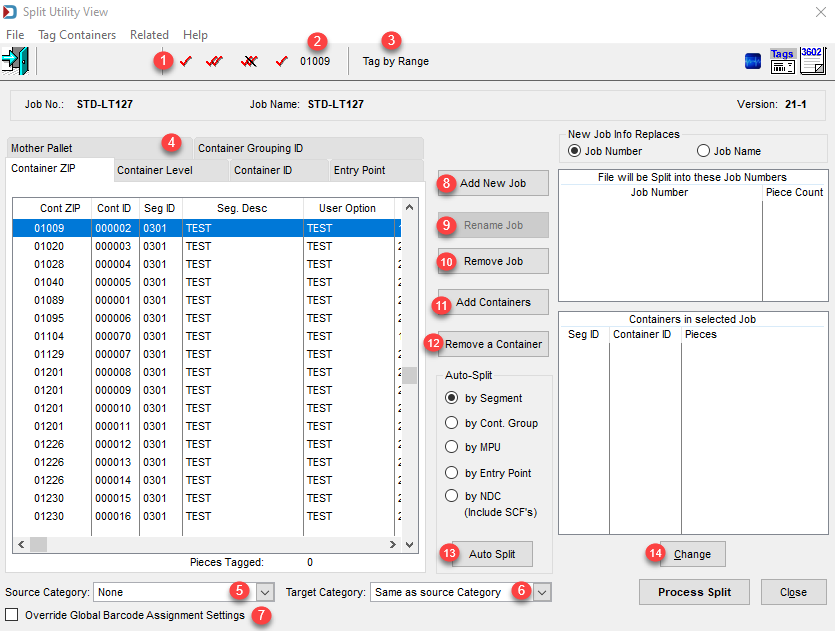
![]() Selectors: The single red checkmark will select one item at a time; the double red checkmark will highlight all; the double red checkmark with a line through it will deselect all the containers selected.
Selectors: The single red checkmark will select one item at a time; the double red checkmark will highlight all; the double red checkmark with a line through it will deselect all the containers selected.
![]() The single red checkmark with a zip code is to select all the same zip. This last one, you may notice when you use that it selects more than this zip. The Splitter keeps pallets intact, so if it find a tray with that zip on a pallet, it will select the entire pallet.
The single red checkmark with a zip code is to select all the same zip. This last one, you may notice when you use that it selects more than this zip. The Splitter keeps pallets intact, so if it find a tray with that zip on a pallet, it will select the entire pallet.

![]() Tag by Range: this option allows you to select a range or deselect mail.
Tag by Range: this option allows you to select a range or deselect mail.
-
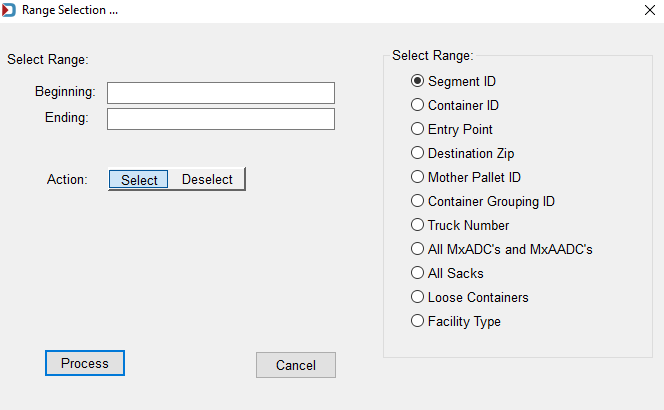
The Range Selectionscreen is used to set a range for one of the Mail.dat fields, such as Container ID.

-
Choose the Mail.dat field to use in the Select Range section of the screen.
-
Set the Beginning and Ending range.
-
Click the Action either Select or Deselect.
-
To complete the selection of items or removal of items, click Process.
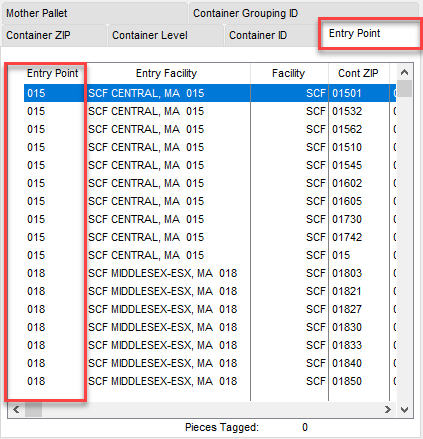
![]() Views: By clicking on one of these tabs: Mother Pallet, Container Grouping ID, Container ZIP, Container Level, Container ID, or Entry Point, it allows you to view the mail in the order selected. For example, if Entry Point is selected, this view shows the entry point zip as the first column, and the entry zips are in ascending order.
Views: By clicking on one of these tabs: Mother Pallet, Container Grouping ID, Container ZIP, Container Level, Container ID, or Entry Point, it allows you to view the mail in the order selected. For example, if Entry Point is selected, this view shows the entry point zip as the first column, and the entry zips are in ascending order.
If the mail is palletized, when you select one tray or sack, a message will appear that the remaining containers on the pallet will be selected. The Splitter is not used to split pallets. Splitting pallets would be performed in Palletize > Mother Pallet View.

![]() Source Category: If your Company uses job categories, you can filter mail by (for example, pre-production or production) this category when selecting jobs. You can change the Source Category or keep it as is.
Source Category: If your Company uses job categories, you can filter mail by (for example, pre-production or production) this category when selecting jobs. You can change the Source Category or keep it as is.
![]() Target Category: This is the job category you want to assign to the new split job or jobs.
Target Category: This is the job category you want to assign to the new split job or jobs.
![]() Override Global Barcode Assignment Settings: This checkbox can be used if tags are printed, and you need DAT-MAIL to ignore your global barcode assignment settings.
Override Global Barcode Assignment Settings: This checkbox can be used if tags are printed, and you need DAT-MAIL to ignore your global barcode assignment settings.
![]() Add New Job: When manually splitting a job, click this to add a new job that containers can be added.
Add New Job: When manually splitting a job, click this to add a new job that containers can be added.
![]() Rename Job: Highlight a new job that was created, then click this to rename it.
Rename Job: Highlight a new job that was created, then click this to rename it.
![]() Remove Job: Highlight a new job and click this to delete it.
Remove Job: Highlight a new job and click this to delete it.
![]() Add Containers: Once you select containers to add to a job, click this button to add it to the new job.
Add Containers: Once you select containers to add to a job, click this button to add it to the new job.
![]() Remove Containers: If you selected and added the wrong container, highlight the new job on the right, then in the bottom pane Containers in selected job, highlight the container to remove and click this button.
Remove Containers: If you selected and added the wrong container, highlight the new job on the right, then in the bottom pane Containers in selected job, highlight the container to remove and click this button.
![]() Auto Split: Automates the splitting of a job by allowing you to choose how you would like to split the job, and then it will create the new split jobs without you having to select containers. You can auto-split by Segment, Container Grouping, Mail Piece Unit (MPU), Entry Point, and NDC (include SCF's).
Auto Split: Automates the splitting of a job by allowing you to choose how you would like to split the job, and then it will create the new split jobs without you having to select containers. You can auto-split by Segment, Container Grouping, Mail Piece Unit (MPU), Entry Point, and NDC (include SCF's).