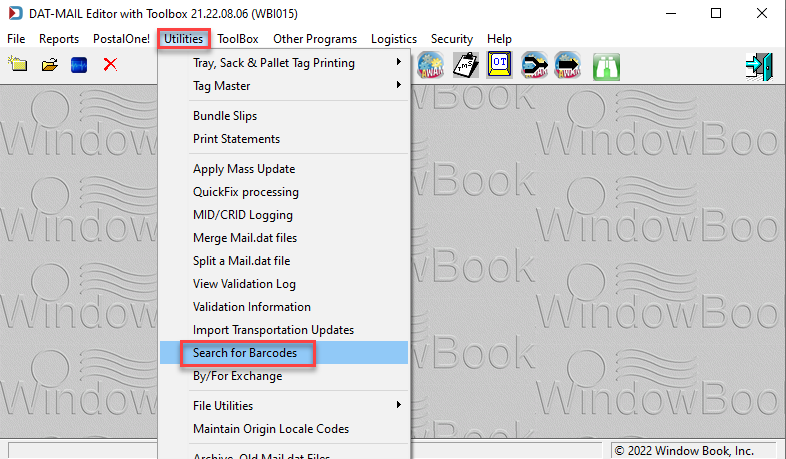
Utilities > Search for Barcodes
If you want to find a container or piece barcode's job, you can use this function to perform a barcode search. It also allows users to reprint tags of the searched container and also allows you to create a sibling container for the scanned tray, sack, or pallet. In addition, piece barcode searches let you know if the piece has been marked as spoiled or short. If you are using wbSCAN, you can scan the barcodes and find job information, see Scan > Search Barcode for details.
-
Go to Utilities > Search for Barcodes.
-
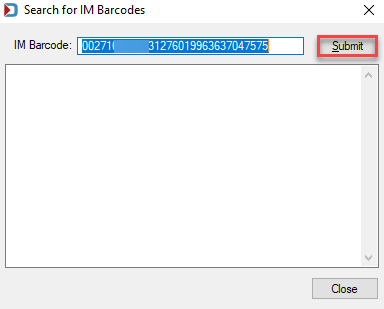
The Search for IM Barcodes input window appears. Enter the Intelligent Mail (IM) Barcode for a container or piece and click Submit.
-
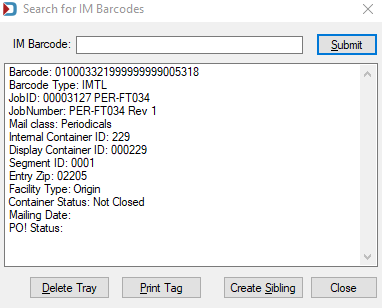
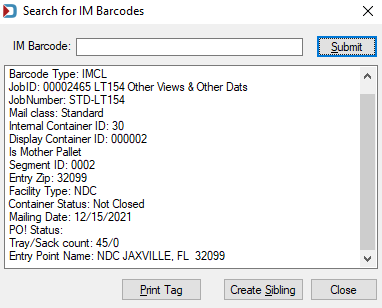
If it finds the barcode, it will return the following:
Below the print screen is an explanation:
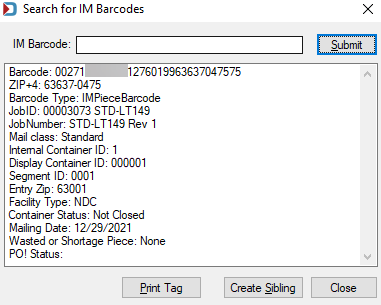
We provide information to confirm that you are using the correct Mail.dat file when a job has been rerun. When you scan a piece, it confirms whether it is in the correct tray, sack, or regular pallet.
ZIP+4: For piece barcodes, it will show this zip which is the first 5 or 9 digits of the Piece Barcode.
Barcode Type: You will see whether you scanned a piece (IMPieceBarcode), handling unit (IMTL), or regular or mother pallet (IMCL).
IM Piece Barcode:
IMTL - Handling Unit Barcode (tray, sack, etc.)
IMCL - Regular or Mother Pallet (if a mother pallet, it lists the tray or sack count)
Tray Count for Mother Pallet
Sack Count for Mother Pallet
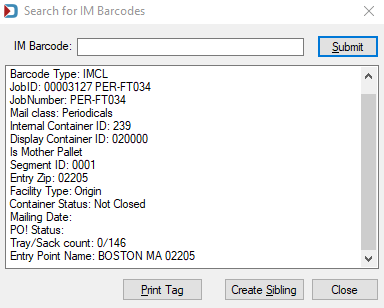
Job ID: The system-generated Job ID and the Job Name (Mail.dat HDR file's Job Name/Title & Issue field).
Job Number: Besides providing the Job Number, it includes the revision number. In this example, 'Rev 1.' If you imported the file twice and the second one duplicates the first. You immediately know that the barcodes are registered to the first import (revision).
If you have not submitted the first job to PostalOne!, the barcodes will change be registered under the next revision number.
Mail class: Like the USPS, we often use Standard instead of Marketing Mail.
Internal Container ID: The Container ID field that is unique across the entire job. It is CSM-1006. You will see Display Container ID on your container labels.
Display Container ID: Since reports and labels have the Display Container ID, this is the most likely ID you will reference. However, suppose you duplicate Display Container IDs. For example, you restart the tray's Display Container ID back to 000001 each time you move to a new pallet or entry point, or segment, you may need to know the Container ID to troubleshoot an issue.
Segment ID: If you have multiple segments, this can further assist in finding a container.
Entry Zip: If you have a barcode with a zip that does not go to an entry point, this helps flag an issue.
Facility Type: This indicates whether it will be going to an NDC, SCF, ADC, Origin, etc.
Container Status: Let you know whether the container is submitted to PostalOne!. Not Closed has not been submitted to PostalOne! for payment. Paid has been submitted. If you have requested a Preliminary Statement for that container, it will show Preliminary. And if you have deleted a container in DAT-MAIL, it will show Delete as the status. If you see Cancel, it means you canceled the statement you submitted to PostalOne! and postage has not been paid.
Mailing Date: This is the Actual Container Ship Date (CSM-1113) if populated.
Wasted or Shortage Piece: When scanning piece IM Barcodes, you can see if the piece has been marked as spoiled or short.
PO! Status: This will confirm whether the job has been uploaded to PostalOne! when you use the PostalWeb Connector (PWC). If you see a status of Exported from DAT-MAIL, it has not been successfully uploaded yet. Likewise, postage has not been paid if you see Qual Report Generated. And until you see Postage Stmt Generated, you have not submitted it to PostalOne! for payment.
Tray/Sack count: This count is populated for a Mother Pallet.
Entry Point Name: This is shown for mother or regular pallets.
Delete Tray: As long as the job has not been submitted to PostalOne!, you can delete a tray with this option.
Print Tag: When this is selected, the Override Tag Printing Settings window will appear, so you have a chance to change the printer or the label format. For more information about overriding tag printer and tag format, see Override Tag Printing Settings.
Create Sibling: Siblings can be created for handling units and pallets. Search for the applicable container barcode and click Create Siblings. After the sibling is generated, the Override Tag Printing Settings window will appear so you can print the sibling label.
Return to Utilities Menu