Installation Steps on Linux
Make sure the necessary requirements are met prior to beginning the installation of TrueAddress (TA) (refer to PRODUCT-SPECIFIC REQUIREMENTS FOR USE for more information).
The installer for the Linux compatible version of TA is a .zip file that needs to be downloaded from the TA download page on Window Book’s website. The user who will own TA and set the group if it is to be shared with a group of users, should log on to the Linux machine to perform the installation. This “user” is also referred to as the “owner”.
To install the Linux version of TA, perform the following:
-
On the Linux machine, create a ‘tatemp’ directory by using the following command:
Copymkdir tatempAt this time, the owner performing the install should create and/or set a group if TA is to be shared with a group of users. In the example in the screen image below, it was discovered that there were two groups: “jrenier”; and “common”, with “jrenier” being the set/active group (the set group is the one displayed in the left-most position). It was decided to change the set/active group to “common”, so they entered the command ‘newgrp common’ [enter]. When the groups were listed again, this time “common” was now the set group (displayed in the left-most position).

-
Once the correct group is set or made active, download the current version of the installer into the ‘tatemp’ directory using the following command:
In Linux, case is important! (See https://www.howtogeek.com/137096/6-ways-the-linux-file-system-is-different-from-the-windows-file-system/ for more information.) Be aware of the case being used when entering commands.
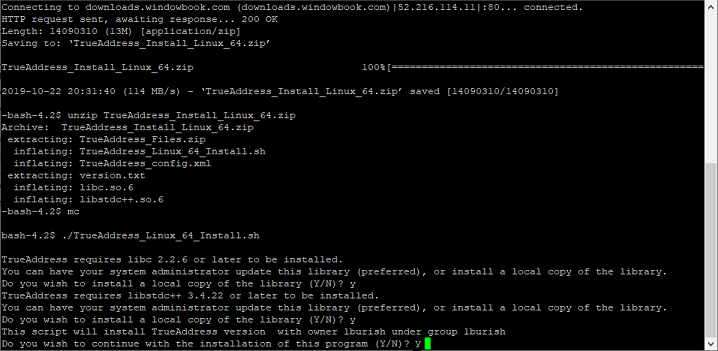
Copywget downloads.windowbook.com/TrueAddress_Install_Linux_64.zipConfirmation the download occurred will display.

-
Enter the command ls -l to view the file(s) located in the ‘tatemp’ directory.
Copyls-lThe install .zip file will display:

-
Unzip the downloaded file using the following command:
Copyunzip TrueAddress_Install_Linux_64.zipThe screen will update as the file is unzipped.

-
List the contents of the ‘tatemp’ directory in long list format enter the command:
Copyls -lThe permissions consist of three sets of three characters that convey the reading (r), writing (w) and/or execution (x) permissions for the “owner”, “group”, and everybody else (“world”).

-
The directory contains a “TrueAddress_Linux_64_Install.sh” command line or script file. Run the script file by entering the following command:
Copy./TrueAddress_Linux_64_Install.sh -
The following message and question will display: “This script will install TrueAddress version [version number] with owner [owner name] under group [group name]".
"Do you wish to continue with the installation of this program (Y/N)?” If the owner and group specified is correct, type “Y”.

-
Enter “Y” to allow group access to TrueAddress and “N” to allow world access to TA.

-
The installation will automatically create a ‘TrueAddress’ folder where the product will be installed and suggest a location for the folder based on the current home directory. Confirm and/or change the suggested path. Use a ‘/’ to begin the path.
In the example being referenced here, the current home directory was ‘jrenier’; however, the directory where the ‘TrueAddress’ folder was to be created and ultimately installed is changed to ‘common’ (not to be confused with the “common” group mentioned earlier in this procedure (refer to Step 1 above). Enter the path of where TA is installed, when this prompt displays:
 Copy
Copy/home/common/TrueAddress -
Enter the requested information beginning with “Company Name” through “Contact Name”. When finished, “Are you installing NCOA? [N] will display.
If you do not purchase NCOA from the USPS, Type N and Enter.
Or if you have NCOA, type Y and Enter.
-
If you answered "N", then the installation will show completed successfully. Skip to step 17.
Or if you answered "Y", then it will prompt you to enter a NCOA Data Directory NCOA_Data is the default, which you can override.

-
When it shows NCOA Daily Delete directory [NCOA_Data] hit Enter.
-
When it shows NCOA Monthly Logs directory [NCOA_Logs], hit Enter.
-
When it shows NCOA Reports Directory [NCOA_Reports], hit Enter.
-
It will display that TA installation completed successfully.

-
On the server or computer where TA is being installed, minimum versions of specific libraries (specifically, libc (C runtime support) and libstdc++ (C++ runtime support)))) must be installed (refer to Product Specific Requirements). The installation script will check the versions of these libraries and will warn if either is not current enough, providing the option to copy newer libraries to the 'TrueAddress' directory.

It is preferred to have a Client’s System Admin update the libraries before running the installation script; however, it is not necessary.
-
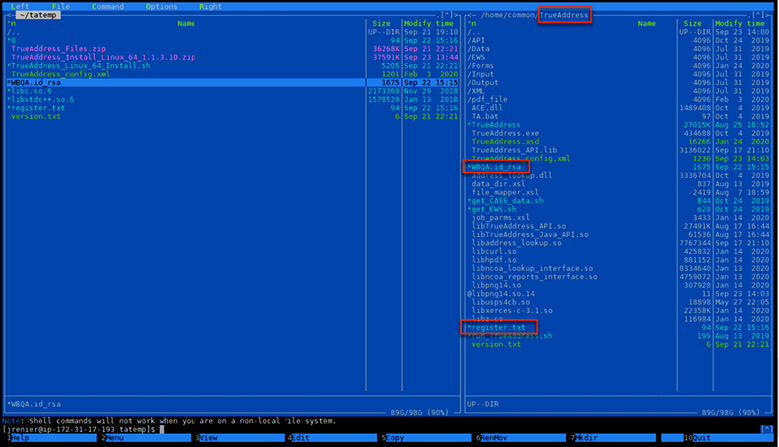
The ‘register.txt’ file and the SSH key file (.rsa file) provided by Window Book should be copied to the main directory where TA is installed.

The name of the .rsa file shown in the image above (specifically “WBQA.id”) will not be the same as the file sent to individual Clients by Window Book. File name varies by the individual Client.
-
In the ‘TrueAddress’ main directory, run the following command to register the Linux server:
This registration step only needs to be performed one time (at the time of the first installation). Skip this step, when updating the software.
Copysftp sftp.trueaddress.netThe following response will display:
The authenticity of host 'sftp.trueaddress.net (34.194.247.109)' can't be established.
ECDSA key fingerprint is SHA256:8cLrnC2zjigLkQhme1/29CZnrc2q5xNgj5MD/pv611Q.
ECDSA key fingerprint is MD5:a4:03:b1:fa:ac:a7:73:6c:43:7b:0c:73:6b:59:bd:35. -
Answer “yes” to the following question:
Are you sure you want to continue connecting (yes/no)? yes
The following response will display:
Warning: Permanently added 'sftp.trueaddress.net,34.194.247.109' (ECDSA) to the list of known hosts.
-
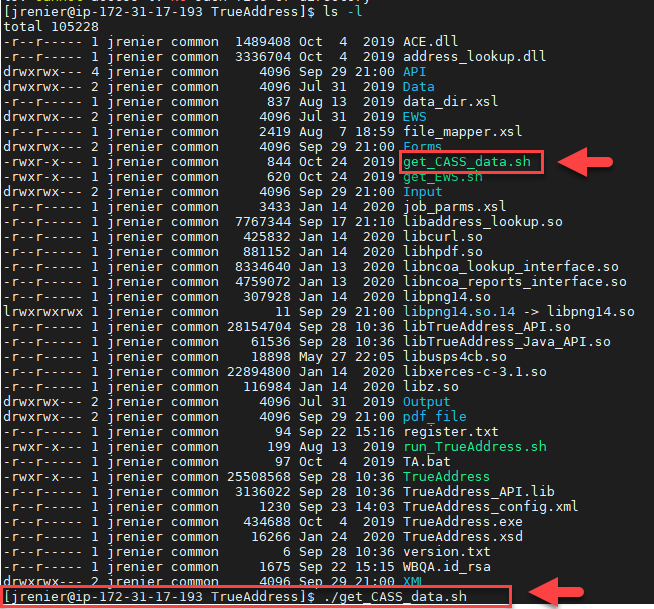
Run the scripts to download and extract the USPS data and EWS information to their corresponding directories (‘Data’ and ‘EWS’).
To extract USPS Data, run the following command:
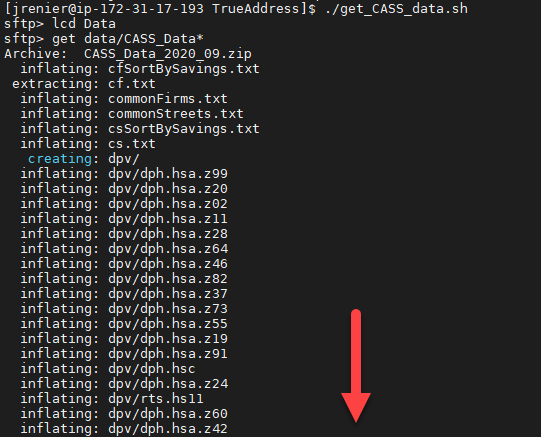
Copy./get_CASS_data.sh
After a few minutes, the data will begin downloading/extracting.

-
When the download/extraction of the USPS data completes, perform the same procedure for the EWS information.
To Extract EWS Information, run the following command:
Copy./get_EWS.shThe download/extraction for the EWS information is completed very quickly.
The ews.txt file should be placed in the WB/TrueAddress/EWS folder

Clients must update the CASS data monthly. If using EWS, the EWS file must be updated weekly.
If you do not have NCOA, the installation of the Linux version of TA is complete! Use instructions are provided in the TrueAddress®(TA) - OnPrem User Guide.
If you have NCOA, please continue.
-
Window Book does not provide the necessary NCOALink data and is therefore not responsible for the update of the NCOALink data in TA. Clients should refer to their specific licensee performance requirements dictated by the USPS for determining how they are to receive their NCOALink data, and when it should be updated (as specified in your license agreement). After you are certified, paid for NCOA and filled out the Electronic Product Fulfillment Web Access Request Form. The USPS will provide you with credentials for their Electronic Product Fulfillment website so you can download the NCOA data.
Updated NCOALink data should be extracted to the ‘/home/common/TrueAddress/NCOA_Data’ directory on the server or computer where TA is installed.
Enter the following commands below:
Copycd /home/common/TrueAddress/NCOA_DataCopy./extract_NCOA_DB.sh /home/common/TrueAddress/NCOA_Data/ncl18ankht_256.tarOur tar file ncl18ankht_256.tar will not be the same as the name of your .tar file, change the above to its name.
-
The installation of the Linux version of TA is complete! Use instructions are provided in the TrueAddress®(TA) - OnPrem User Guide.
Continue Updating CASS & EWS Data