Installing Software
As previously stated, the installation of 1-PASS Prep (1PP) is completed using an installer wizard. The wizard will create a ‘WB’ directory on the server or computer, with a ‘1PP’ sub-directory. If a ‘WB’ directory already exists on the server or computer (for example, other Window Book products are already installed), the install wizard will select/use that same ‘WB’ directory for installing 1PP.
To install 1PP, perform the following:
-
Close any open Window Book software application.
-
Download the latest version of the installation executable file from https://www.windowbook.com/Support/Downloads.
-
Right-click on the installer’s executable file and select Run as administrator.
-
An install wizard verification progress dialog will display.

-
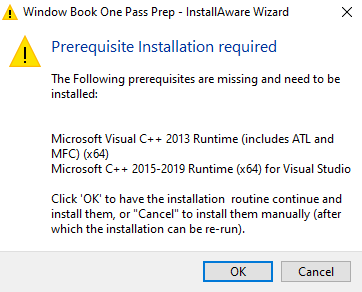
Microsoft Visual C++ 2015 through 2019 runtimes must be installed. The install wizard will check to see if these runtimes are installed on the server or computer where 1PP is being installed. If any of these runtimes are not found, a Prerequisite dialog will display, informing the user which runtime is needed.
Clicking OK will close the dialog and the wizard will install the necessary prerequisites for the user. Clicking Cancel will abort the 1PP installation and the user will have to manually install the necessary prerequisites.

If the CANCEL button is clicked, the installation wizard can be run again to install 1PP after the necessary prerequisites have been installed manually by the user.
-
Assuming OK is clicked, the install wizard’s Visual C++ installation screen will display. Click Next to continue.
If prerequisites are already installed, The Welcome to the Setup Wizard... screen will appear, skip to Step 7.

-
A Please wait... screen will display. When the installation of the prerequisites completes, click Next to continue.

-
The Welcome to the Setup Wizard for Window Book 1-PASS Prep will display. Click Next to continue.

-
When the Please exit all applications...screen appears, select the I accept the terms of the License Agreement checkbox. Click Next to continue.

-
A release notes screen will appear (this screen will be removed soon). Click Next to continue.

-
The Choose the application folder screen will appear, click Next to continue.
Window Book strongly recommends using the default path and folder provided. Changing the drive letter is okay, but please leave the path structure as is.

-
The Choose Start Menu group screen will appear. It has the Start Menu group specified and provides some other options to be enabled (for example, Create a Desktop Shortcut. Leave the Start Menu Group as the default and enable the other options as needed). When ready, click Next to continue.

-
The Ready to update your system screen will appear, click Next to continue.

-
A progress screen will display (image not shown here). The person installing might not see this display because the installation occurs so quickly.
-
The product installation is complete! Click Finish.

Continue Installing Labeling Lists