AWAM - Import Profile Example - Release Files With Spoilage
Some of our Clients who have jobs that need no updates except spoilage will mark those pieces and immediately send the jobs to PostalOne!. However, if you need to update anything beyond spoilage, you have the Post Processing section available to update your jobs, such as dates and generating reports.
Warning, if you usually bring jobs into DAT-MAIL and overwrite tray and pallet barcodes, make sure to turn that feature off in your profile.
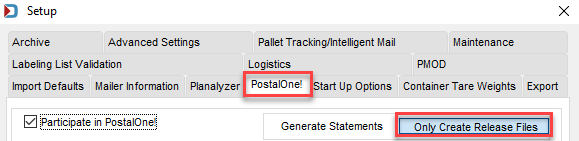
If you are a Client switching from Generate Statements to Release Only. Go to File > Program Settings > Program Setup. In the Setup screen, select PostalOne! tab. Select Only Create Release Files. When this is selected, the Generate Statements option will be disabled. Click OK to close the Setup screen.
To create an import profile to only create release files with spoilage, perform the following:
-
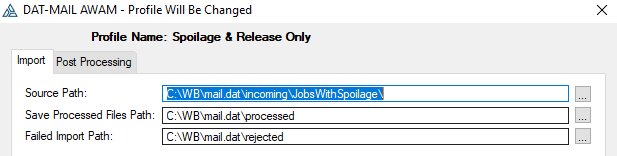
Launch AWAM. Create a new AWAM Import profile as instructed in AWAM - Creating & Using an Import Profile. You can name the new import profile "Spoilage & Release Only" and specify the various folders for it to use (Source, Processed, and Failed).
In a server-with-workstations environment, you must use UNC path names for the folder paths.
-
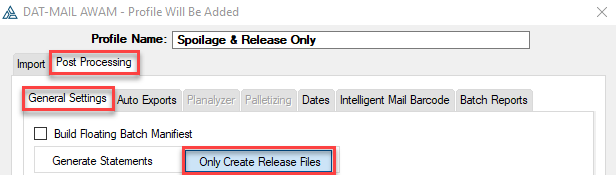
Select the Post Processing tab. Next, confirm Only Create Release Files option is selected (default option).
-
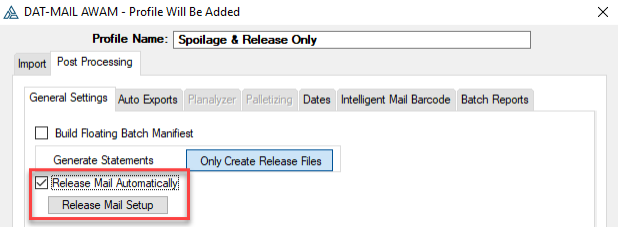
Select the Release Mail Automatically option and click Release Mail Setup.
-
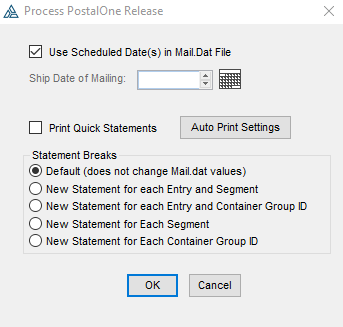
The Process PostalOne Release window will display. In addition, the Use Scheduled Date(s) in the Mail.dat File checkbox will be selected (default option). Notice that when you click OK to close the screen, there will be a message "Changes to release mail setup have been saved" (second image).
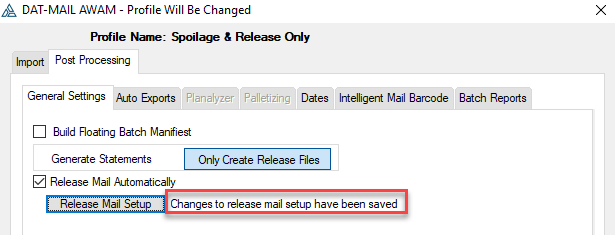
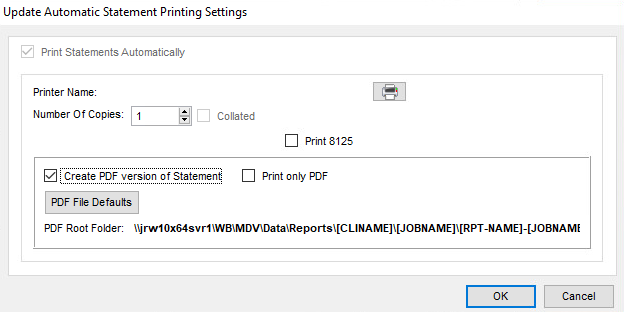
If you do not see "Changes to release mail setup have been saved.". You likely selected the Print Quick Statements and need to go into Auto Print Settings to set a printer or save your statements to PDF files. Go back into the Process PostalOne Release window and click Auto Print Settings to set the printer or save the statements to PDF. Here's an image of a completed Update Automatic Statement Printing Settings window.
-
When finished with any other updates in the Post Processing sections, click OK to save the profile.
-
Ensure to
 activate the profile for use (refer to AWAM - Activating & Deactivating Profiles for more information). Appropriate Mail.dat files can now be dropped into the specified “source” or import folder, and AWAM will complete the import process. Once a file imports, DAT-MAIL will generate an original release, check for pending spoilage, and create an updated release. The release will account for any spoilage within the file and make the proper adjustments.
Return to AWAM - Example Profiles