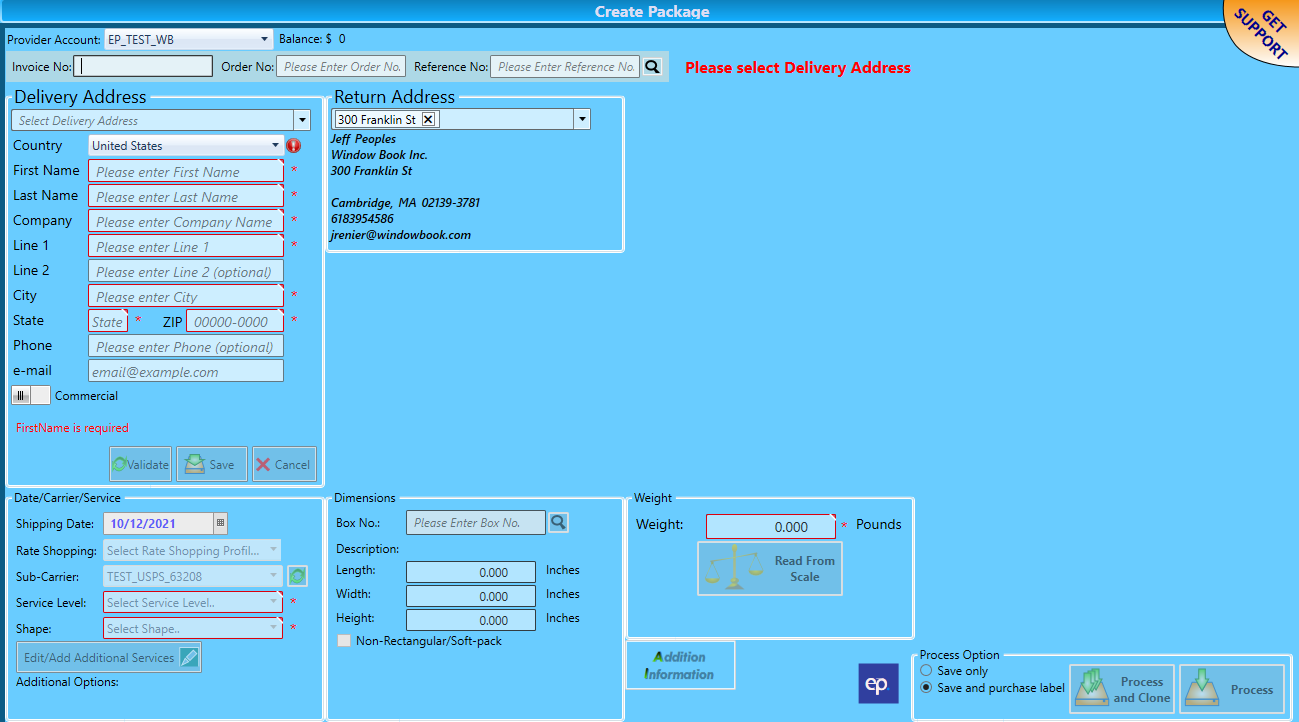
Create Package - Overview of Screen
Here a general description of the screen is shown. More detail will follow in the Create Package - Description of Create Package Screen.

-
Provider Account: The provider account displays as the default account. If using more than one provider, clicking the drop-down allows you to select a different provider. When a provider is selected, the provider account’s balance available is to the right.
-
Reference Bar: The following fields are available – Order No, Invoice No, Reference No, and Box No. Enter the reference fields applicable to this package. The fields shown depend on the reference bar settings in Settings > Optional Settings > Reference Bar.
-
Delivery Address: A delivery address can be selected from the drop-down or manually entered. If manually entered, all the fields with an asterisk (*) are required.
-
Return Address: The return address displays as the default return address. When multiple return addresses are available, click the drop-down to select a different return address.
-
Date/Carrier/Service: This section of the screen changes based on the provider selected. The fields are Shipping Date, Hold, Carrier, Rate Shopping, Sub-Carrier, Drop Off Type, Service Level, Shape, and Additional Services. Click the drop-down on each field to select the appropriate value. Additional services are available but not required and may be an additional charge.
-
Shipping Date: It defaults to today’s date, click
 Calendar to set a different date.
For International Bridge, a Hold checkbox is available.
-
Carrier or Sub-Carrier: The Carrier field shows if the default provider account is International Bridge since only the USPS is available as a Carrier. If the default provider account is EasyPost then the Sub-Carrier field appears. Window Book currently supports the following carriers USPS, UPS, FedEx, and DHL Express.
-
Drop Off Type: If the sub-carrier selected is FedEx, then the Drop Off Type field is available. There are five (5) drop-off types: Regular Pickup, Scheduled Pickup, Retail Location, Station, or Drop Box.
-
Rate Shopping (EasyPost default Provider Account): Select the rate shopping profile from the drop-down. If a rate shopping profile is not available or a new one is required, see Create Rate Shopping Profile.
If rate shopping is selected, then the carrier selection is based on the rate shopping profile you choose.
-
Dimensions: If applicable, either click
 Search or scan a barcode to select a box or manually enter the Length, Height, and Width. If a package is non-rectangular or a soft pack, select the Non-Rectangular/Soft-pack checkbox. Boxes are created in Settings > Optional Settings > Box Lookup
 -
Weight: Enter the weight of the package before processing; while dimensions are conditional, weight is always required. Weight can be read from a scale.
-
Additional Information/Notes: Using CTRL and Enter keys, you can pop up the Notes field to add information about a package. Or click on Additional Information. This is also a Reference Fields in Required Settings > General that you can include on a label. See Settings > Required Settings > General for more information.
-
Process Option:
-
Save only
-
Save and purchase label
-
Save, purchase and print label
-
-
Then select either Process and Clone or Process.
-
Process and Clone: opens a new Create Package screen with the same information as the previous package.
-
Process: opens a blank Create Package screen.
-
Continue Create Package - Description of Create Package Screen.