Home Screen Details
 Clicking Home displays the Home screen. This screen displays information about DAT-MAIL, a setting for database record retention, a function for switching to UNC path names for specific folders, and information for each possible MDR Client configuration. This page will direct you to the setup page for the various features on the Home screen.
DAT-MAIL Settings
For information on DAT-MAIL Settings, see Home Screen Setup - DAT-MAIL Settings.
Database Record Retention Setting
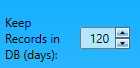
This setting allows you to select how long you wish to keep records in the database: specifically, the ‘debug.log’ (stored in the “MDSMDL” table), the ‘validation.log’ (stored in the “MDSMVL” table), and the ‘event.log’ (stored in the MDSMReceipt” table). The default value or setting on a newly installed system is 120 days (optimal).
You may need to keep data for the entire 120-day duration (or longer). However, Window Book has found that system performance may suffer due to the rapid growth of the tables containing the records generated by the MDR Clients. Refer to Advanced Settings Screen Detail for information on combating this (both manually and automatically).
Switch to UNC
For information on Switch to UNC, see Home Screen Setup - Switch to UNC.
MDR Client Configurations
For the initial setup of an MDR Client, see Home Screen Setup - Creating an MDR Client Site Configuration.
MDR Client Site Configuration Screen
This section will cover each message, option, and field in more detail. If an MDR Client site was previously installed, clicking the appropriate MDR Client environment, shown with Edit (versus Create), will display the configuration settings screen.
Below the print screen is an explanation:
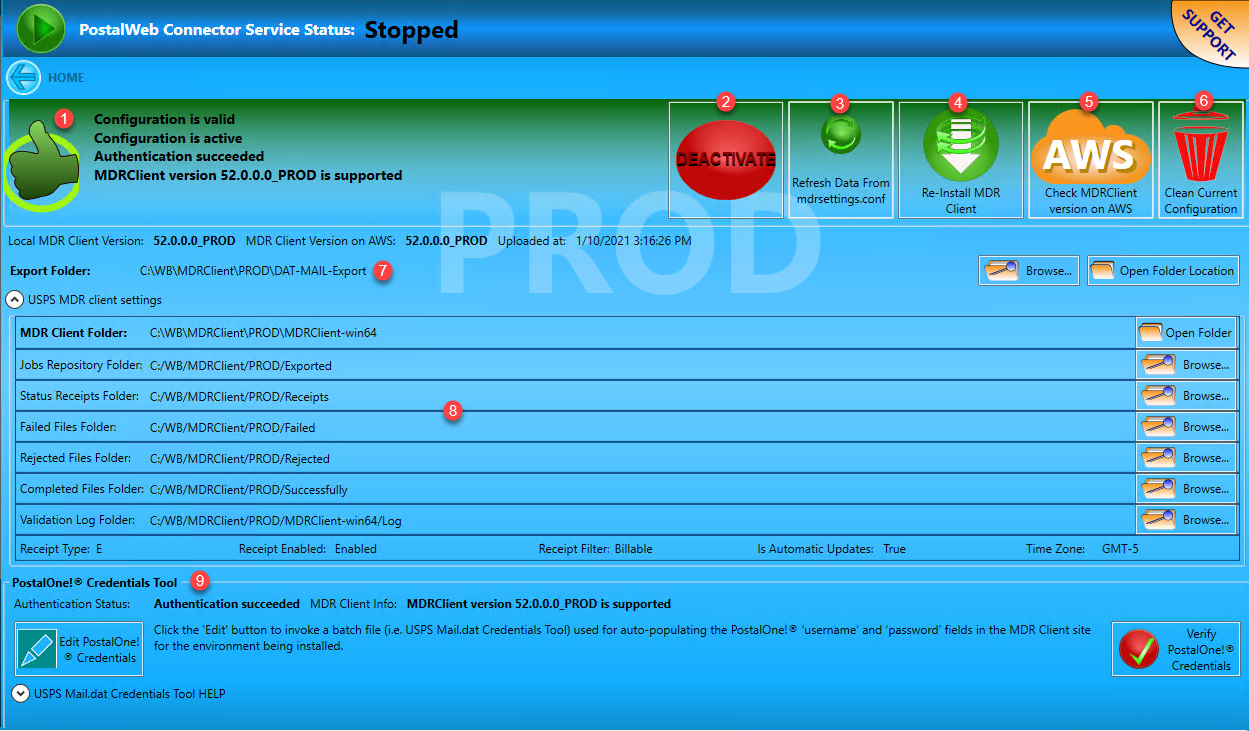
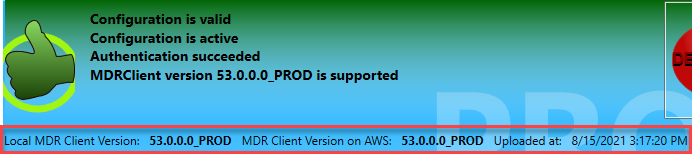
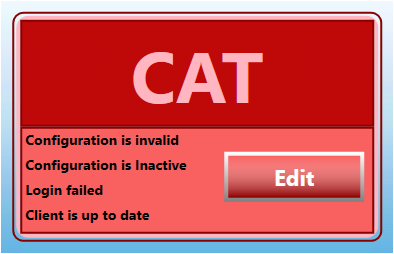
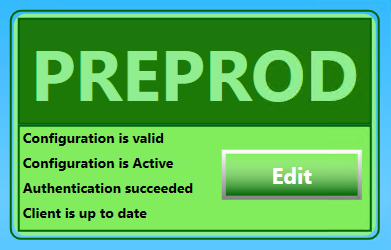
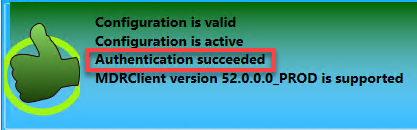
![]() This portion of the configuration settings screen displays whether the configuration is valid, active, successfully authenticated with PostalOne!, and the version of the MDR Client installed. How this area of the screen displays visually is dependent on the status of the configuration.
This portion of the configuration settings screen displays whether the configuration is valid, active, successfully authenticated with PostalOne!, and the version of the MDR Client installed. How this area of the screen displays visually is dependent on the status of the configuration.
 or
or 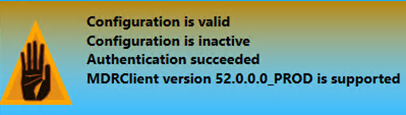
![]() Activate/Deactivate: This option activates the configuration for use or deactivates the configuration.
Activate/Deactivate: This option activates the configuration for use or deactivates the configuration.
The label displayed label and color changes as a configuration is activated or deactivated.
 Deactivate: Shows when the configuration is active, or
  Activate shows when the configuration is inactive.
![]()
 Refresh Data From mdrsettings.conf: This option is used to refresh/repopulate data from a ‘mdrsettings.conf’ file, which is the file that contains the settings for an MDR Client configuration.
![]()
 Re-Install MDR Client: This option can easily download and reinstall the selected MDR Client software if necessary. If the USPS releases a new version of the MDR Client and the installed version of the MDR Client in the PWC becomes ‘old,’ the label for this option will change to read Download latest MDR Client.
In addition, when the PWC service is running, this option will be disabled  . The PWC service must be stopped for this option to be enabled.
![]()
 AWS: This option is intended to check or confirm that the MDR Client version on AWS matches what is currently installed and used. The PWC automatically checks what is on AWS every 15 minutes. This option is to do a hard check in the interim. When clicked, a message displays on the PWC screen. If the local and AWS versions of the MDR Client do not match, stop the service and choose Re-Install MDR Client.
If this does not resolve the issue, click Get Support  and create a ticket.
![]()
 Clean Current Configuration: This option can be used to clear the existing configuration settings in the database, which results in having to re-create the related MDR Client site (if needed). When clicked, the configuration gets cleared, and the user is prompted to select one of two options:
-
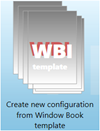 Create new configuration from Window Book template
-
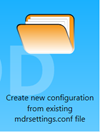 Create new configuration from existing mdrsettings.conf file. Since the ‘mdrsettings.conf’ file does not get deleted when Clean Current Configuration is clicked, this option can be used to create the MDR Client site by navigating to and selecting the pre-existing ‘mdrsettings.conf’ file. For example, if browsing to find the PROD 'mdrsettings.conf' file it would be located in '..:\WB\MDRClient\PROD\MDRClient-win64\config'. The settings in the file will be used to populate the database and create the MDR Client configuration.
 If you have a server- with-workstations environment, if creating a new configuration from the Window Book template, use the Switch to UNC after creating a new configuration.
Ensure the ‘mdrsettings.conf’ file selected pertains to the same MDR Client site created (PROD, PREPROD, CAT or TEM).
![]() Export Folder: This the folder used for staging the Mail.dat files submitted to PostalOne!. On new system installs, it is automatically created during the installation of the MDR Client software, and the default folder name/location is: ‘\\...WB\MDRClient\TEM (the folder is MDR Client-specific)\DAT-MAIL-Export’.
Export Folder: This the folder used for staging the Mail.dat files submitted to PostalOne!. On new system installs, it is automatically created during the installation of the MDR Client software, and the default folder name/location is: ‘\\...WB\MDRClient\TEM (the folder is MDR Client-specific)\DAT-MAIL-Export’.

-
Clicking Browse launches a Browse for folder dialog, which allows the user to view the folder location or change the specified folder.
-
Clicking Open Folder Location launches a File Explorer screen which allows the user to view the folder’s contents.
In a server-with-workstations environment, the UNC pathname must be used for the file path/folder.
In a server-with-workstations environment, mapped drives cannot be used.
![]() USPS MDR Client settings: This portion of the screen displays the various folders and folder paths the MDR Client uses. Clicking the expander arrow
USPS MDR Client settings: This portion of the screen displays the various folders and folder paths the MDR Client uses. Clicking the expander arrow  collapses or expands the settings view. Also, the contents of each folder can be seen by clicking the corresponding folder’s Browse. In addition, specifics of the MDR Client site are also displayed beneath the folder list (specifically, Receipt Type, Receipt Enabled, Receipt Filter, Is Automatic Updates, and Time Zone). The installation program automatically sets these settings; the PWC uses and cannot be changed.
Window Book strongly recommends not moving or renaming the folders displayed. Doing so may result in unexpected behavior and possible loss of data.
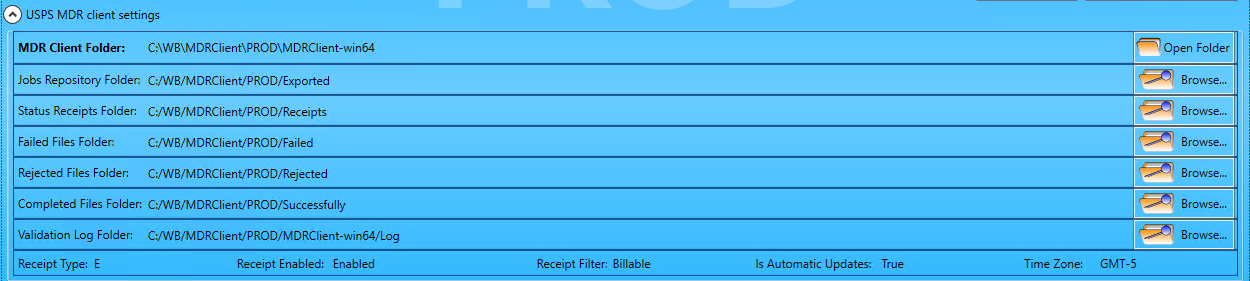
The Time Zone field displays the time zone used when sending and receiving communications with PostalOne!. It is automatically set during the software installation and uses the time zone settings that the software's server or computer uses. The Time Zone is displayed using GMT or Greenwich Mean Time (refer to conversion information).
In a server-with-workstations environment, the UNC pathname must be used for all of the folders listed, except the 'MDR Client Folder.'
![]() PostalOne! Credentials Tool: This area of the screen provides authentication status information and what version of the MDR Client is installed (or supported).
PostalOne! Credentials Tool: This area of the screen provides authentication status information and what version of the MDR Client is installed (or supported).
-
To update or change the PostalOne! login credentials being used, click Edit PostalOne! Credentials.
-
To re-authenticate the existing PostalOne! login credentials, click Verify PostalOne! Credentials.
-
To view the USPS Mail.dat Credentials Tool HELP screen for the USPS Mail.dat Credentials Tool (the tool used to enter PostalOne! logon credentials), press the corresponding expander arrow
 . Then, to collapse the screen, click the expander arrow again .
Editing an MDR Client Site Configuration
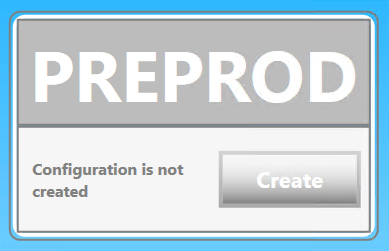
To edit the configuration settings for an MDR Client site, click on the applicable MDR Client on the Home screen. However, if the site’s tile contains Create vs. Edit, the MDR Client does not exist. Refer to Home Screen Setup - Creating an MDR Client Site Configuration for more information in this situation.
Once the MDR Client site configuration screen displays, any necessary updates or changes can be made.
Removing an MDR Client Site Configuration
To remove an MDR Client site from the PWC:
-
Stop the service (if the service is running).
-
Click the applicable MDR Client on the Home screen.
In this example, the PREPROD site is to be removed.
-
The site’s (in this case, PREPROD) MDR Client Configuration screen will display. If the site is active, click
Deactivate. -
Once the site is no longer active, click
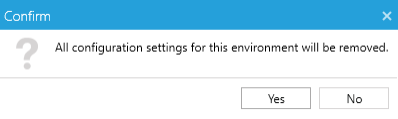
Clean Current Configuration.
-
A Confirm dialog will display. Click Yes to close the dialog and continue with removing the site/configuration.
-
Even though the MDR Client site is removed from the PWC, the site’s data still resides on the server; specifically, the ‘mdrsettings.conf’ file. This file can be used to create the site in the PWC after removing it using the 'Create new configuration from existing mdrsettings.conf file' mentioned above. All the settings used by the old site instance will be used to create or install the new one.
-
If not interested in performing step 6, click the
 back arrow to display the PWC Home screen. The removed site can be reinstalled at any time by clicking the site’s tile on the PWC’s Home screen.
 -
Restart the PWC service.
Updating PostalOne! Credentials
The system will authenticate the PostalOne! credentials for an MDR Client site every time any of the MDR Client site’s tiles 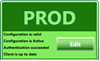 are clicked.
If the PostalOne! credentials specified for an MDR Client configuration require updating (for example, you want to use a different set of credentials or the password for the existing credentials has changed), perform the following:
-
1. Stop the service from the PWC’s Home screen (if the service is running).

-
Click the Edit key associated with the MDR Client configuration containing the PostalOne! credentials that require updating.
-
The MDR Client configuration settings screen will display. Click Edit PostalOne! Credentials located in the PostalOne! Credentials Tool section.

-
A Command Prompt screen will display with a ‘cmd.exe’ file running. Then, the screen will scroll through a series of prompts the user must enter values for (including a good set of PostalOne! login credentials) to continue.
Window Book strongly recommends using a set of PostalOne! credentials specific for Window Book products to avoid possible conflicts and service disruptions if one set of PostalOne! credentials are being used simultaneously for different things.
The ‘cmd.exe’ file does not allow for data re-entry and does not contain an ‘undo’ command. Therefore, ensure the values or data entered at each prompt are correct before pressing the ENTER key. If incorrect data is entered, updating the credentials will continue, and you will need to start over to correct the information.
-
Enter “Y” to continue [press Enter].
-
Enter a valid PostalOne! user ID [press Enter].
-
Enter the password associated with the PostalOne! user ID [press Enter].
-
Confirm the password by entering it again [press Enter].
-
Enter “Y” to write the changes made to the file [press Enter].
-
-
After entering “Y” to write the changes made to the file, the file will update, the screen will close, and the PWC will attempt to authenticate the PostalOne! user credentials entered.
-
When the attempt to authenticate is complete, the MDR Client site configuration settings screen will display. Additionally, whether or not the authentication was successful will be displayed at the top of the screen.
-
Remember to Start the service.
Continue Home Screen Setup