Whittier Tagger BT850 - Quick Start
DAT-MAIL Data Transfer Setup
-
Connect your Taggers: have your Company’s Network Administrator setup a share on your network and connect your Taggers to it (refer to Set Up a Network Share & Connect with the Tagger for instructions). If your Company prefers to use the share built into the Tagger itself, refer to Connecting to the Tagger Built-in File Server from a Windows PC in this Guide for those instructions. If you plan to use a USB drive to transfer data instead of a share, please refer to the Reference Guide section for setup and operating instructions.
-
If you are using a 2D imager/scanner to scan IMb’s for reprinting tray tags or splitting trays, make sure it is configured properly to read IMb’s and add a CRLF to the end of each scan. If you are using a Honeywell 900 or 902 imager, you can scan the barcodes found in Setting up a 2D Scanner Supplied by Whittier Mailing Products or Window Bookto set it up.
-
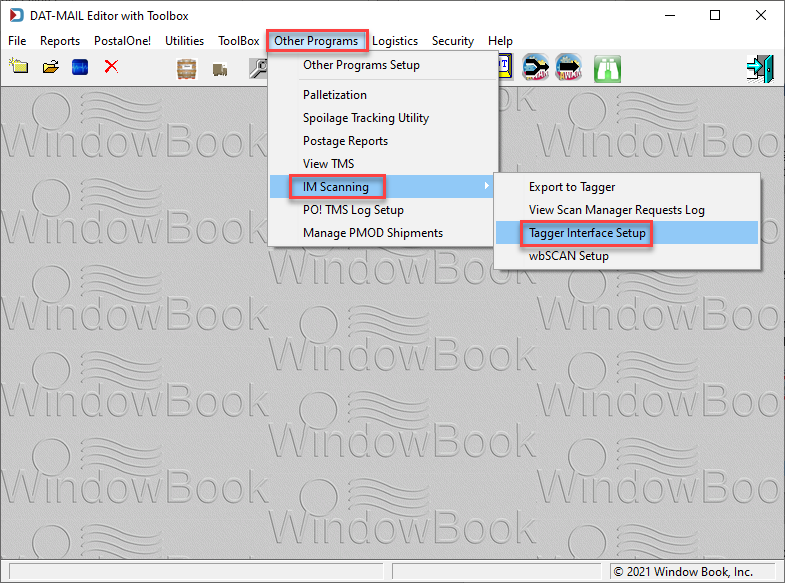
From the DAT-MAIL main screen (all program functions should be closed), select Other Programs > IM Scanning > Tagger Interface Setup.

-
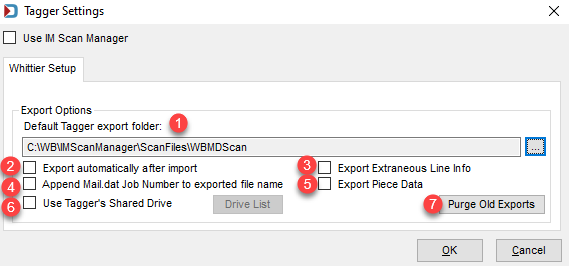
Select the folder you will be exporting your Tagger data to
 . This will either be the network share you setup for the Tagger or the UNC path name of the Tagger’s own share.
-
 If you are using a share either on your network or the Tagger to exchange data, select the Export Automatically after Import checkbox.
 -
 If you use DAT-MAIL to print tray tags today, select the Export Extraneous Line Info checkbox so the same information will print on the extraneous lines of the tags printed by the Tagger.
 -
We are moving from the reference of "Extraneous Line" to "Printer Line (top of label)" to match the USPS terminology "Printer Line" used in their tag specification. DTAC's Mail.dat Specification refers to this line as "User Info Line 1".
-
 If you cannot rely on your Mail.dats to include the job number in the file name, select the Append Mail.dat Job Number to exported file name checkbox (recommended).
 -
 If you have a 2D USB scanner, you can reprint missing or damaged tray tags in Full Service jobs by just scanning a mail piece from the tray. To locate a tray based on an IMb scan, the BT-850 must have single piece data. Selecting the Export Piece Datacheckbox will provide that data.
 -
 If you have more than one Tagger and are using the Tagger’s shares instead of a single share on your own network to exchange data, select the Use Tagger’s Shared Drive checkbox and refer to for information on how to create a list of Tagger’s and their mapped drives or UNC path names.
 -
 If you wish to conserve disk space, purge any old Tagger export files by clicking Purge Old Exports. A separate screen will display asking you to enter or specify a date that will act as a cut-off date for selecting and purging existing files (refer to File Maintenance for more information).
-
Click OK to save your settings. You are ready to set up the Tagger side of the interface.
See also