Defining the Share on the Network
Methods 1 and 3 Only
If you create a share on your network, you need to tell the Tagger what and where it is. You can also indicate a sub-folder to read your Mail.dats from. This is useful if you have multiple Taggers doing “in-line” production and tray tag printing by using different sub-folders to store files that will be produced by specific production lines. Each Tagger can be configured to read data from a different sub-folder of the share. The '\logs' sub-folder where data will be written to by the Tagger should be the same for all Taggers, however. Each log file name includes the Tagger serial number so there is never a danger of file contention.
Example: The mailer has three Taggers and has setup a share on his network called TAGGERS. There are four sub-folders under TAGGERS: \Tagger1, \Tagger2, \Tagger3, and \Logs. The sub-folders Tagger1, 2, and 3 are for files that the mailer wants each of the Taggers to use. The '\Logs' folder is for the data that the Tagger is creating for DAT-MAIL.
All three Taggers will name the “TAGGERS” as the share. Tagger 1 will name the '\Tagger1' sub-folder for its input. Tagger 2 will name the '\Tagger2' sub-folder for its input, and '\Tagger3' will be the sub-folder name for the third Tagger’s (or Tagger 3's) input.
-
From the Tagger’s Main Menu screen, select option 6 for System Settings. The System Settings screen will display.

-
From the Tagger's System Settings screen, select 5 for Network Settings. The Network Settings screen will display.
-
From the Tagger's Network Settings screen, select 2 for Window Share Settings. A Windows Share Settings screen will display.
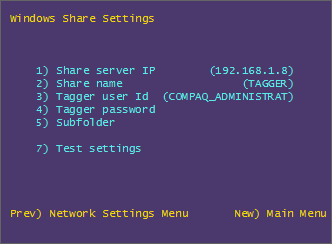
This is where you enter the IP address of the computer that has the share, and the login and password to get to the share. You also enter the share name and, if you are using sub-folders, the sub-folder name you are going to get your data from. The use of a sub-folder for retrieving Mail.dats is optional.
First Time Retrieval
When you retrieving Mail.dats for the first time from the share, perform the following:
-
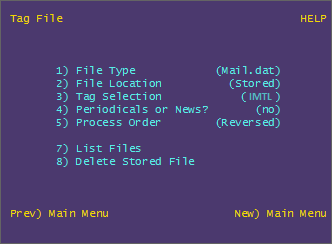
From the Tagger's Main Menu screen select 2 to Get Tag File.
-
The Tagger's Tag File screen will display. Select 2 for File Location.
-
Select Share as the source. The Tagger will retain that setting until you change it. If you wish to retrieve files from a USB flash drive, you can change the source to USB.
Configuring Tray Tag Type and Mailer ID
The procedure for batch printing tags or printing in-line with production is documented in the Whittier's User guide. What is new is the ability to generate sibling tags. You must configure your Tagger to generate IMTL tray tags and also enter a Mailer ID (MID).
Window Book recommends you use a special MID just for this purpose. It needs to be an MID that is not otherwise used to generate Intelligent Mail Tray barcodes in any other program. This way the barcodes generated by the Tagger will not be duplicated by any other program. The USPS can provide extra 9 digit MID’s upon request and no matter how many tray tags you print, there will be plenty of serial numbers available, even with a 9-digit MID to meet the USPS's 45-day uniqueness window. If you don’t do this, it is unlikely that duplicate barcodes will be created since the entire barcode including the ZIP Code portion is part of the uniqueness key, but it is still possible.
See also