Scan > Move Pallets
The Move Pallets function assigns a new location to the scanned pallets. This can be used not only to move pallets from one location to another but is also a way to associate production functions to pallets of mail going through the production process. Locations can be created for different production stages (printing, inserting, bindery, etc.). Then users can scan each placard in the job jacket before starting the process for the mail that will end up on that pallet.
To move a pallet, select Scan > Move Pallets.

The Move Pallets page will display. The screen contains two tabs: Scan and Scan Log. The Scan tab is used to scan an existing pallet for assigning it to a new/different location, and the Scan Log tab displays the list of pallets that the user has scanned/moved. In addition, a Scan2Pay tab may be displayed. More information about these tabs and Move Pallets screen is provided below.
Move Pallets - Scan tab
Enter or select the new location or production function that is to be associated with the pallet that is to be moved (required). A list of the existing locations or production functions can be viewed by clicking the question mark displayed to the right of the Location field.
Refer to Browse > Locations and Browse > Categories for more information.
Scan the barcode of the pallet that is to be moved and click Save (if necessary - the barcode reader being used may be set up to append a “Return” at the end of the barcode so that clicking Save is not necessary).
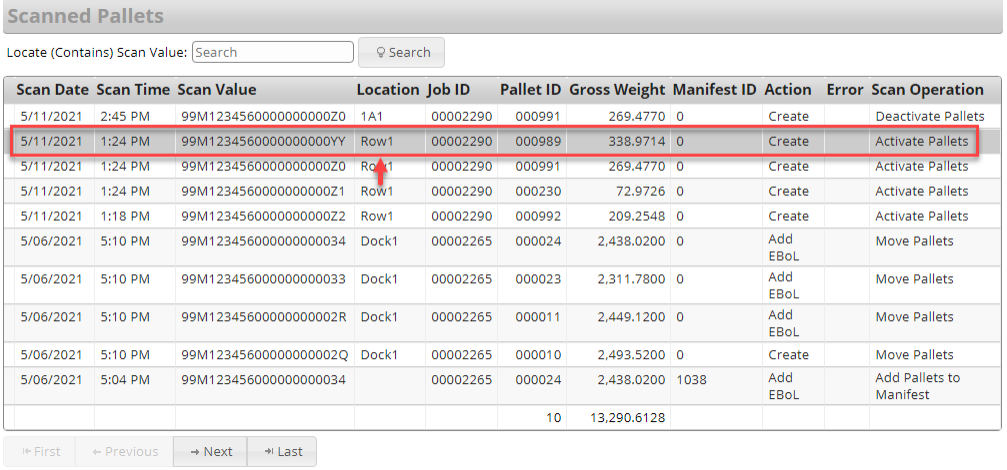
In the example below, the pallet was originally activated with a Location of “Row1”.

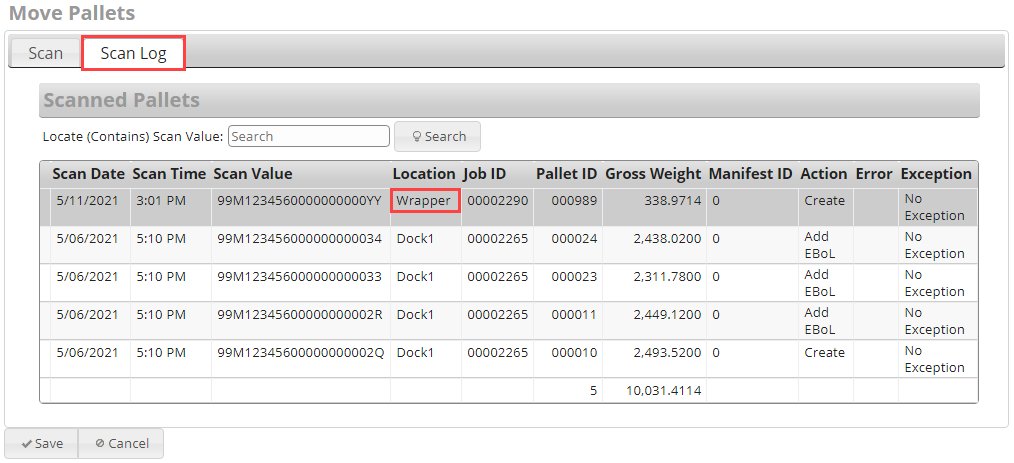
Using the Move Pallets function, the pallet (in this example, ‘Pallet ID 000989’) was assigned a new Location ('Wrapper').

Move Pallets – Scan Log tab
To view a list of pallets that were “moved”, click Scan Log tab. In the example above, Pallet ID 000989 was moved to the Wrapper Location.

The list of deactivated pallets will display on the screen. The following information for each pallet is provided:
-
Scan Date: Date the pallet was scanned.
-
Scan Time: Time the pallet was scanned.
-
Scan Value: Pallet bar code that was scanned.
-
Location: Location assigned at time of scan.
-
Pallet ID: The Pallet ID corresponds to the Mother Pallet ID in DAT-MAIL.
-
Gross Weight: The gross weight of the pallet.
-
Manifest ID: The manifest number the pallet is assigned to (if applicable).
-
Action: Values displayed identify the last ‘action’ or function that occurred for the corresponding pallet. The possible values are:
-
CFID: Consolidation Facility ID.
-
Create: Order created.
-
Edit: Order updated.
-
Add EBoL: Pallet added to a manifest.
-
Remove EBoL: Pallet removed from a manifest.
-
Dispatch: Pallet is dispatched.
-
Skip: Pallet is skipped.
-
Cancel: Order is cancelled.
-
Uncancel: Order is uncancelled.
-
Move Pallets – Scan2Pay tab
The Scan2Pay tab is only displayed if Move Pallets is enabled as a trigger for the Scan2Pay function. Scan2Pay is a wbSCAN feature that allows mailers to scan pallets as they are produced and let the shop floor staff either mark the pallet for payment or pay postage for the scanned pallets in PostalOne! Refer to Scan2Pay for more information.
Return to Scan Menu List
See also