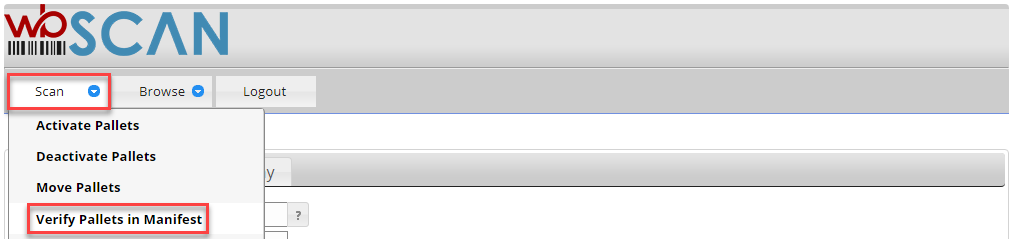
Scan > Verify Pallets in Manifest
The Verify Pallets In Manifest function allows users to select a manifest and then scan the pallets as they are loaded onto a trailer. It will show a count of unscanned pallets in the manifest and as each is scanned, the count will be reduced. This tells the operator when they have completed the loading of the trailer. If a pallet that does not belong to the manifest is scanned, the user will be alerted to not load the pallet and the scan will be rejected.
To verify the pallets on a manifest, select Scan > Verify Pallets in Manifest.
The Verify Pallets in Manifest screen will display. The screen contains three tab options: Scan, Scan Log, and Pallets. The Scan tab is used to scan and verify the individual pallets that are associated with a selected manifest, the Scan Log tab displays the list of pallets that the user has scanned for verification, and the Pallets tab displays the list of pallets that are associated with the selected manifest. In addition, a Scan2Pay tab may also display. More information about each tab is provided below.
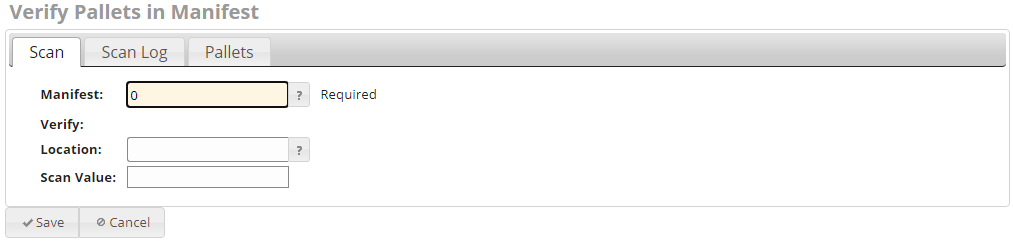
Verify Pallets in Manifest – Scan tab
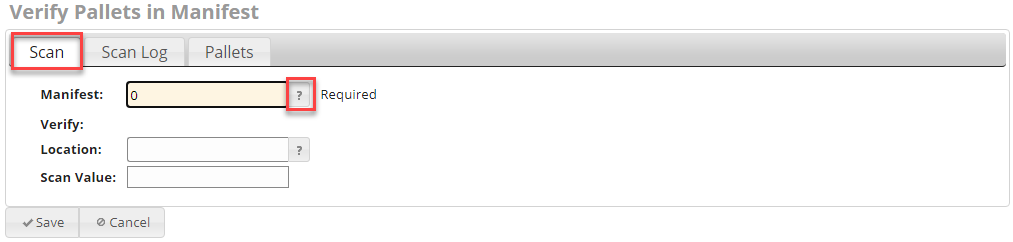
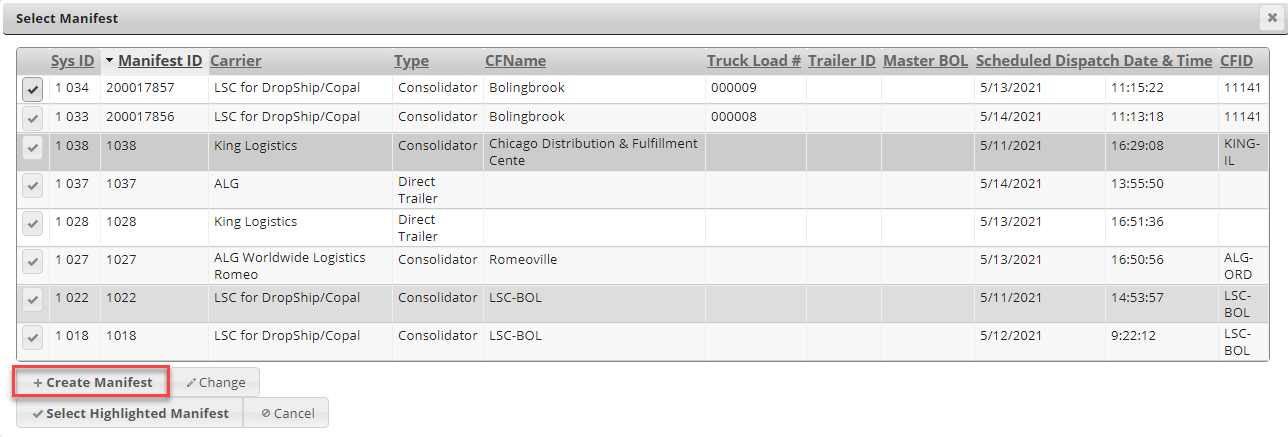
Select a manifest (required) to verify pallets against. To display the list of existing manifests, click the  question mark button located to the right of the Manifest field.
The Select Manifest page will display. A list of existing manifests will display. Highlight the manifest to select by single-clicking on it and then click Select Highlighted Manifest, or simply click the  check mark button that displays immediately to the left of the Sys ID column.
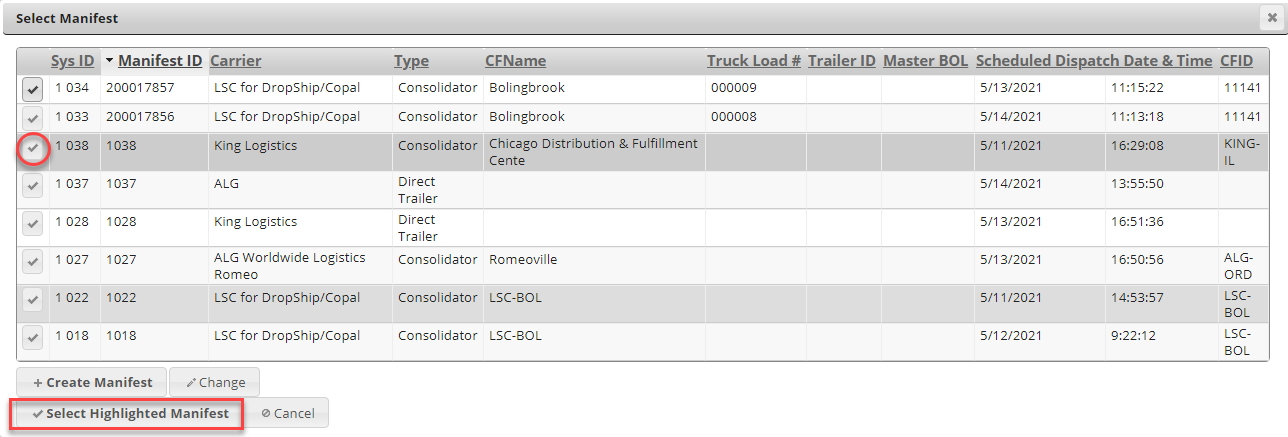
If a manifest or no manifests exist, users can create a manifest by clicking the Create Manifest. For more information, refer to Browse > Manifests for instructions.
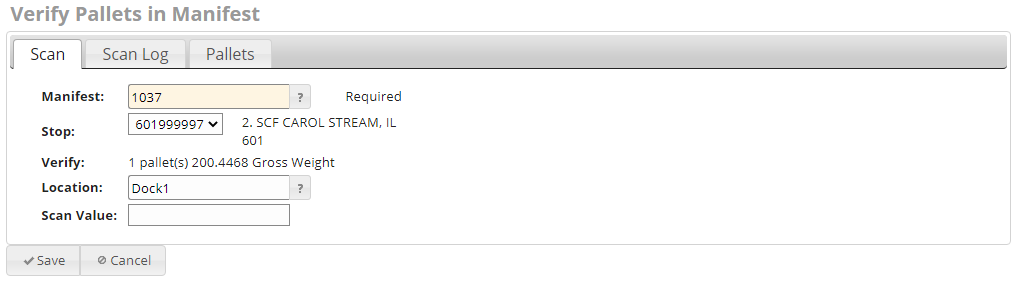
When a manifest is selected, the user will automatically be re-directed back to the Scan tab and the manifest ID will be populated in the Manifest field. In addition, the number of pallets and the gross weight contained on the manifest will also display. If the selected manifest is for a trailer type that contains stops, the information pertaining to the first stop will display. To view the information for each stop (if there is more than one), click the down-arrow for the Stop field and select a stop from the list.
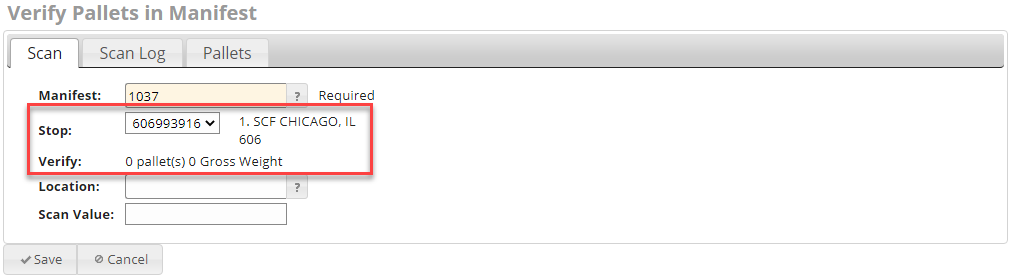
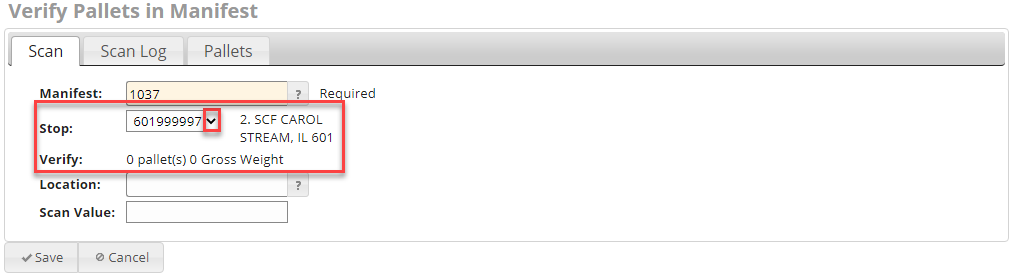
If the user wants to associate the pallet to be scanned/verified to a location or production function (optional), highlight the Location field, and enter, scan, or select a location from the list of existing locations by clicking the question mark immediately to the right of the Location field. If the pallet is assigned to a specific stop, make sure to select the stop before attempting to associate it with a specific location.
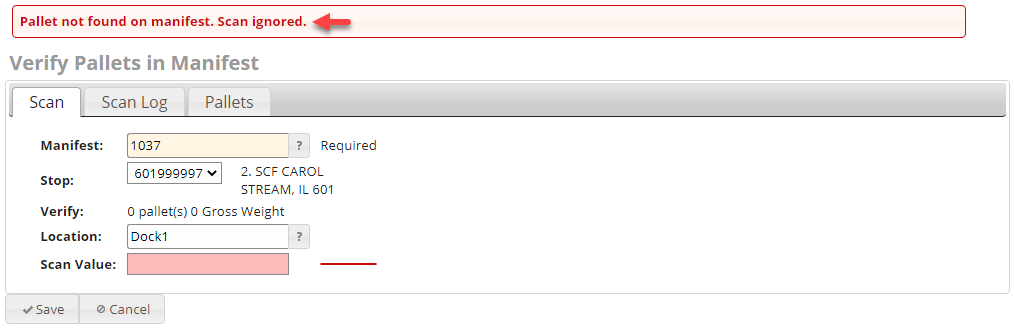
Scan the barcode of the pallet that is to be verified and click Save (if necessary - the barcode reader being used may be set up to append a “Return” at the end of the barcode so that clicking Save is not necessary). If the pallet is assigned to a specific stop, make sure to select the stop before attempting to scan/verify it.
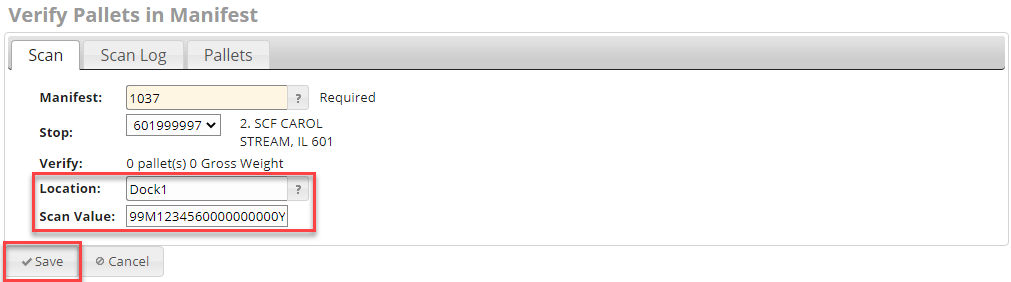
The number of pallets on that manifest and the gross weight will be displayed to the right of the Verify field. As pallets are being verified (scanned), the number of pallets and the gross weight will reduce accordingly. If an incorrect pallet is scanned, an error message will show.
Verify Pallets in Manifest Scan Log Tab
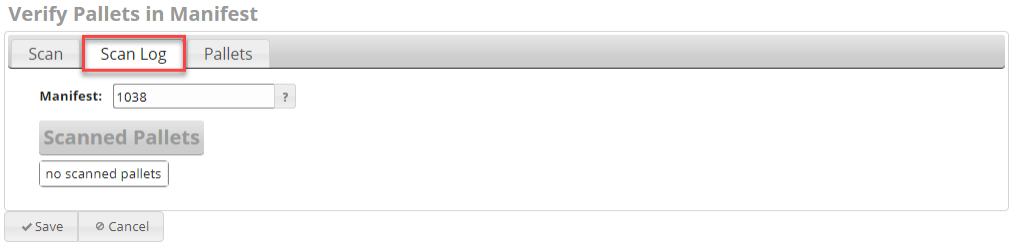
To view a list of pallets that were scanned (verified) against a particular manifest, click the Scan Log tab. If a manifest was already selected in the Scan tab screen, the same manifest will remain selected in the Scan Log screen and any pallets that were scanned/verified for it will automatically display.
To view the pallets scanned/verified for a different manifest, click the question mark located to the right of the Manifest field and select a different manifest from the available list.
If the selected manifest contains stops, the user will have to select the stop on the Scan tab to be able to view the scanned pallets for it in the Scan Log tab.
Until pallets are verified, the Scan Log tab will not show any pallets.
Verify Pallets in Manifest – Pallets tab
The Pallets tab displays the pallets that are associated with the selected manifest. If a manifest is for a trailer that contains stops, the pallets displayed will be for the stop selected within the Scan tab.
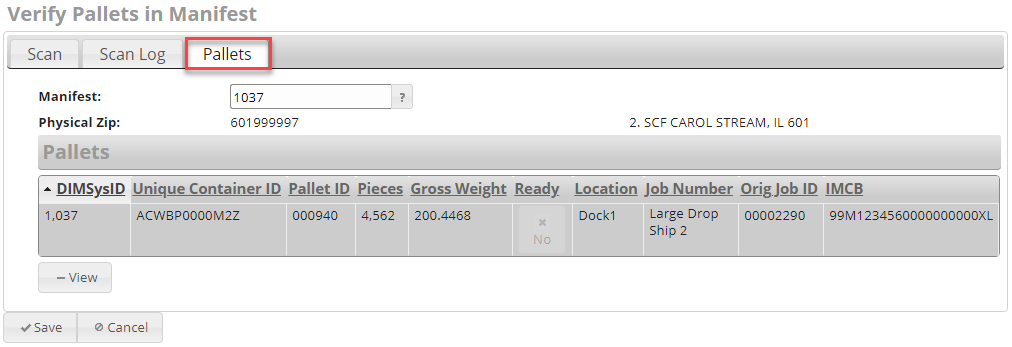
The following information is provided for each pallet in the list:
-
DIMSys ID): The manifest number or ID. If using MCTM, this ID also corresponds with the same Manifest ID in DAT-MAIL.
-
Unique Container ID (User Container ID): The unique value associated with the pallet. This same ID is also present in DAT-MAIL.
-
Pallet ID: The Pallet ID corresponds to the Mother Pallet ID in DAT-MAIL.
-
Gross Weight: The gross weight of the pallet.
-
Ready: Whether it is ready to ship.
-
Location: Location assigned at time of scan.
-
Job Number: The job number assigned to the job upon import to DAT-MAIL.
-
Orig Job ID: The job ID that was assigned to the job upon import to DAT-MAIL.
-
IMCB (Intelligent Mail Container Barcode): A value applied to mailer-generated container labels used for scanning to uniquely identify pallets. This value will correspond with the same field found in DAT-MAIL for the same job.
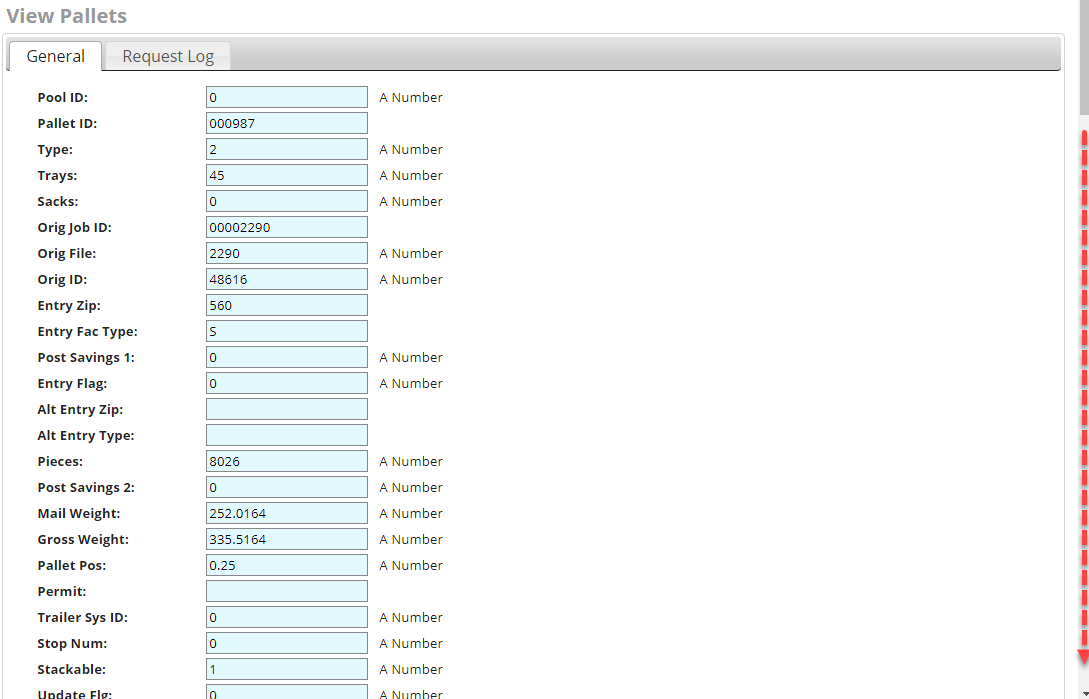
Highlighting a pallet and clicking View will display all of the pallet-specific detail information.

For documentation purposes (i.e. size constraints), the entire field list is not displayed in the image below.
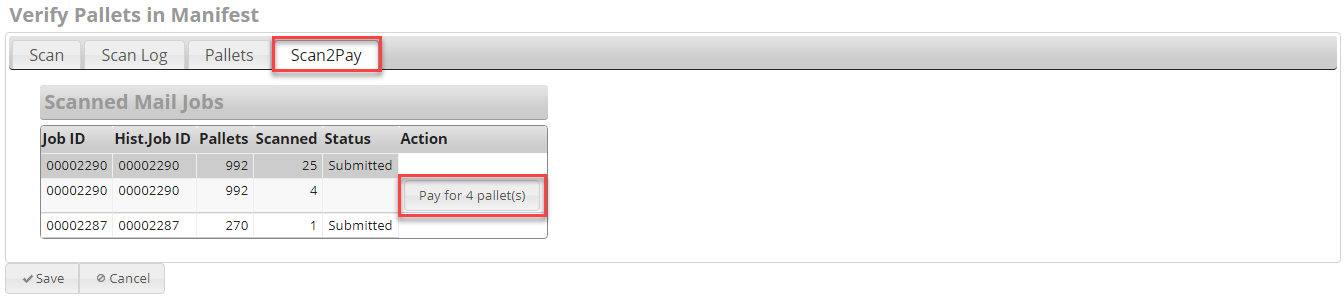
Verify Pallets in Manifest – Scan2Pay tab
This tab is only displayed if Verify Pallets in Manifest is enabled as a trigger for the Scan2Pay function. Scan2Pay is a wbSCAN feature that allows mailers to scan pallets as they are produced and let the shop floor staff either mark the pallet for payment or pay postage for the scanned pallets in PostalOne! Refer to Scan2Pay for more information.
In the image below when pallets are verified, they move to where they are ready to pay. Click Pay for 4 pallet(s) and based on your settings for Scan2Pay, you may be marking pallets for payment for someone to submit from DAT-MAIL or it could be that they are automatically submitted for payment as soon as someone clicks Pay for # pallet(s).
Return to Scan Menu List
See also