CASS Information
The information provided in this section is specific to running CASS only. Examples will be provided below in CASS Example Files.
Updating CASS & EWS Data
Make sure your TrueAddress (TA) installation has the latest CASS and EWS data. Below, links are provided to the Linux and Windows installation guides for instructions on how to update CASS and EWS.
Updates to the CASS data must occur monthly. The EWS file updates are available weekly.
The procedure to update the data (USPS and EWS) is specific to the type of system TA is installed on. Instructions for updating CASS and EWS are provided in the applicable TA Installation Guide - TrueAddress®(TA) OnPrem - Linux Installation Guide and TrueAddress®(TA) OnPrem - Windows Installation Guide.
CASS Example Files
With the installation of TA, example files are included (CASS and NCOA) to assist the user. The example files pertaining to CASS that are included are listed on the next page.
Window Book strongly recommends creating a copy of any of the example Form or XML files before making any modifications to them so that an original always exists.
Located in the ‘WB\TrueAddress\Input’ folder are example CASS input files:
-
Example_Celeb.pipe
-
Example_GSA_buildings.csv
-
Example_GSA_Buildings_fixed.txt
Located in the ‘WB\TrueAddress\Forms’ folder are example CASS form files:
-
Count_Report
-
Create3553
-
Example_Celeb_HTML_end
-
Example_Celeb_HTML_row
-
Example_Celeb_HTML_start
-
Job_Log_End
-
Job_Log_Start
-
usps.jpg (logo image file)
Located in the ‘WB\TrueAddress\XML’ folder are example CASS XML files:
-
Example_Celeb.xml
-
Example_GSA_Buildings_delimited
-
Example_GSA_Buildings_fixed
If the above example CASS files are run as-is, the following CASS Output files will be created and will be in ‘WB\TrueAddress\Output’:
-
Example_Celeb.html
-
Example_GSA_Buildings_3553.pdf
-
Example_GSA_Buildings_fixed_2.txt
Using Example Files
Example XML files (CASS only) can be found in the ‘TrueAddress\XML’ directory. If using one of the example XML files provided, there is text that is job-specific and must be changed/updated accordingly.
Window Book strongly recommends creating a copy of any of the example XML files before making any modifications to them so that an original always exists.
Using the example file “Example_Celeb.xml” (provided), the following text is specific to each job run, therefore must be updated accordingly:
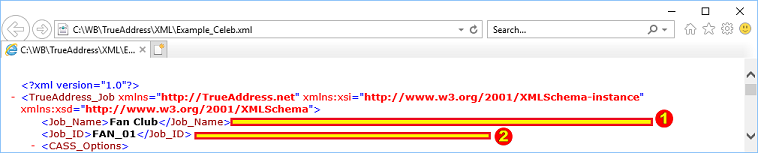
![]() <Job_Name>ENTER CLIENT’S JOB NAME HERE</Job_Name> (Example above: “Fan Club”)
<Job_Name>ENTER CLIENT’S JOB NAME HERE</Job_Name> (Example above: “Fan Club”)
![]() <Job_ID>ENTER CLIENT’S JOB ID HERE </Job_ID> (Example above: “FAN_01”).
<Job_ID>ENTER CLIENT’S JOB ID HERE </Job_ID> (Example above: “FAN_01”).
Within the file’s <CASS_Options> element, the following text is specific to each job run, therefore must be updated accordingly:
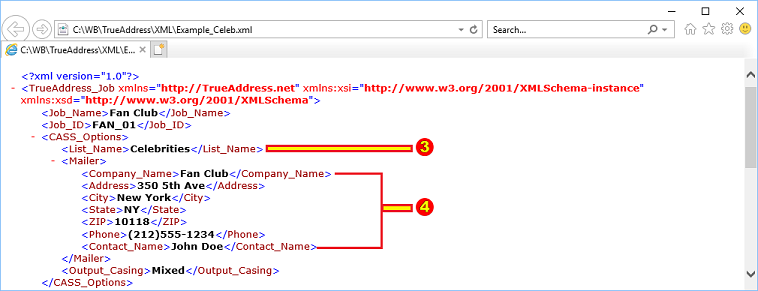
![]() <List_Name>ENTER CLIENT’S LIST NAME HERE]</List_Name> (Example above: “Celebrities”). The List Name is simply text used to describe the job.
<List_Name>ENTER CLIENT’S LIST NAME HERE]</List_Name> (Example above: “Celebrities”). The List Name is simply text used to describe the job.
![]() All of the text under the <mailer> element must be changed to be Client-specific (specifically, <Company_Name>, <Address>, <City>, <State>, <ZIP>, <Phone>, <Email>, and <Contact_Name>).
All of the text under the <mailer> element must be changed to be Client-specific (specifically, <Company_Name>, <Address>, <City>, <State>, <ZIP>, <Phone>, <Email>, and <Contact_Name>).
Within the file’s <Input_File> and <Output_File> elements, the following text is specific to each job run, therefore must be updated accordingly:
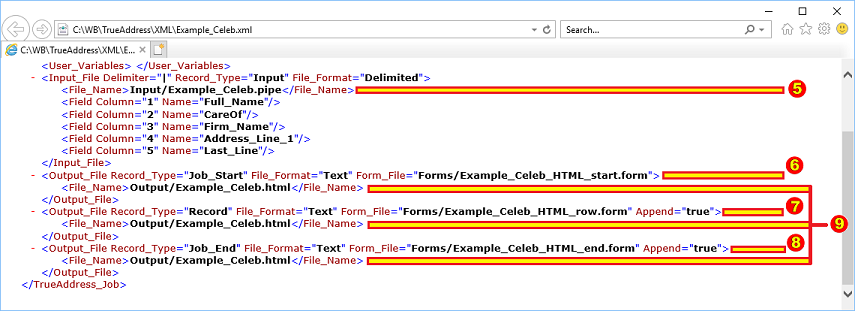
![]() <Input_File…><File_Name>[ENTER DIRECTORY AND CLIENT’S INPUT FILE NAME]</File_Name> (Example above: “Input/Example_Celeb.pipe”).
<Input_File…><File_Name>[ENTER DIRECTORY AND CLIENT’S INPUT FILE NAME]</File_Name> (Example above: “Input/Example_Celeb.pipe”).
The “Example_Celeb.xml” file has been configured to use an input file that is in a “Delimited” format, using a delimiter of “|” (see image above - line above the <File_Name> text). If the input file being used by the Client is of a different format and/or uses a different delimiter, these values or specifications would also have to be changed by the user.
The “Example_Celeb.xml” file calls on three example form files to use in the creation of the final output file. Depending on the desired output, using form files is not always required. The example form files being used in the “Example_Celeb.xml” file are located in the ‘Forms’ directory and are:
-
 “Forms/Example_Celeb_HTML_start.form”
 -
 ”Forms/Exmple_Celeb_HTML_Row.form”
 -
 “Forms/Example_Celeb_HTML_end.form”
All three form files require a designated output file name and a location of where the results should be saved (the generated results of each form are saved into the same output file). In the “Example_Celeb.xml” file, the output file location and name is: ![]() “Output/Example_Celeb.html” . “Output” refers to the directory name of where the results file will be saved to.
“Output/Example_Celeb.html” . “Output” refers to the directory name of where the results file will be saved to.
Note the difference, the XML file being used to generate the output file is named “Example_Celeb.xml” and the resulting output file name will be “Example_Celeb.html”.
The command line to generate the results or output file for this particular job would be:
./TrueAddress TrueAddress_config.xml XML/Example_Celeb.xmlIf an error message is returned when attempting to run a batch command, refer to Troubleshooting for assistance.
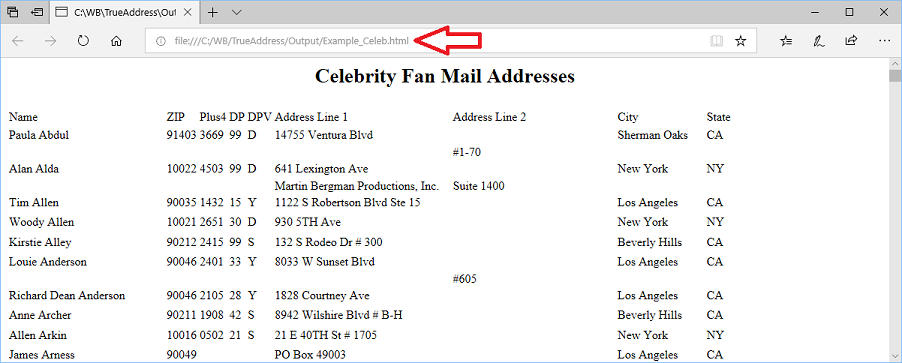
Image of the “Example_Celeb.html output file:
Generating a USPS Form 3553
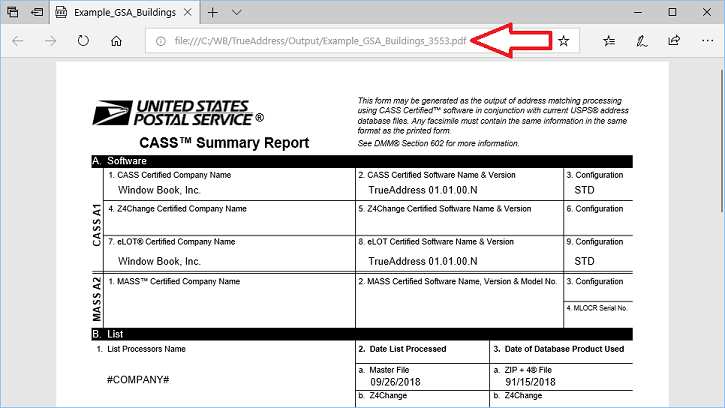
USPS Form 3553 is a CASS certification form. The Post Office may require this CASS certification form when submitting automation (barcoded) or carrier route mailings. Form 3553 shows how many address matches were attempted, how many were matched, when the matching was done, and the date of the file that was used. Clients are not required to submit Form 3553 to the USPS unless the USPS asks for it, but it is necessary to generate it and present it to the Post Office to qualify for USPS postal discounts. If the job output is not intended for a mailing, form 3553 is not required.
Refer to the example file “XML\Example_GSA_Buildings_fixed.xml” for the commands needed to generate a USPS Form 3553.
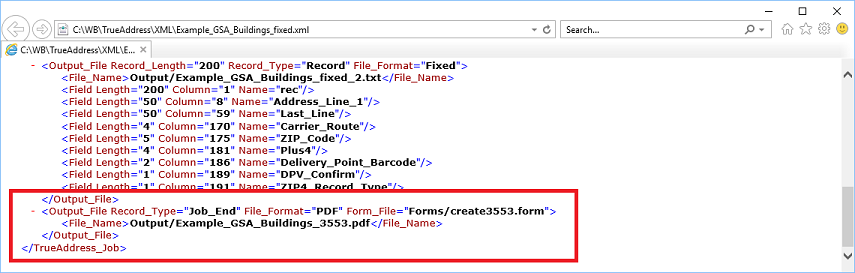
This example XML file (above) calls on an example Form file located in the ‘Forms’ directory (specifically, “Forms/create3553.form”).
IMPORTANT: Do NOT change the “create3553.form” file! The format is dictated by the USPS and cannot be altered.
The value for the File_Format should always be “PDF”.
Besides generating an output text file (refer to image above, specifically “<File_Name>Output/Example_GSA_Buildigns_fixed_2.txt”), this particular XML example file also generate a results file “Example_GSA_Buildings_3553.pdf” and saves it in the ‘Output’ directory.
To generate a 3553 PDF with a different file name, edit this value (and possibly the location as well).
Example:
<File_Name>Output/ABCCompany_Job15_3553.pdf</File_Name>
The new file named “ABCCompany_Job15_3553.pdf” would be created and saved in the ‘Output’ directory.
CASS Job Summary Form
In addition to the USPS form 3553, you can also generate a text document that contains job summary information. Summarized information for Record Counts, Deliverability Scores, Match Return Codes, DPV Confirmation Codes, DPV Footnotes, DPV Flags, Address Enhancements, Residential Indicator, ZIP4 Record Types, and ZIP4 Footnotes is provided. The job summary form is stored in the ‘Forms’ directory and is named “Job_Summary.form”.
Refer to the following excerpt from the example file “XML\Example_GSA_Buildings_fixed.xml” for the commands needed to generate a CASS job summary.

Once the job runs, the CASS job summary text file named in the XML file (image above) – (for example, “Example_GSA_Buildings_Summary.txt”) will be saved to the ‘Output’ directory.

See also