AWAM Control Center – In Detail
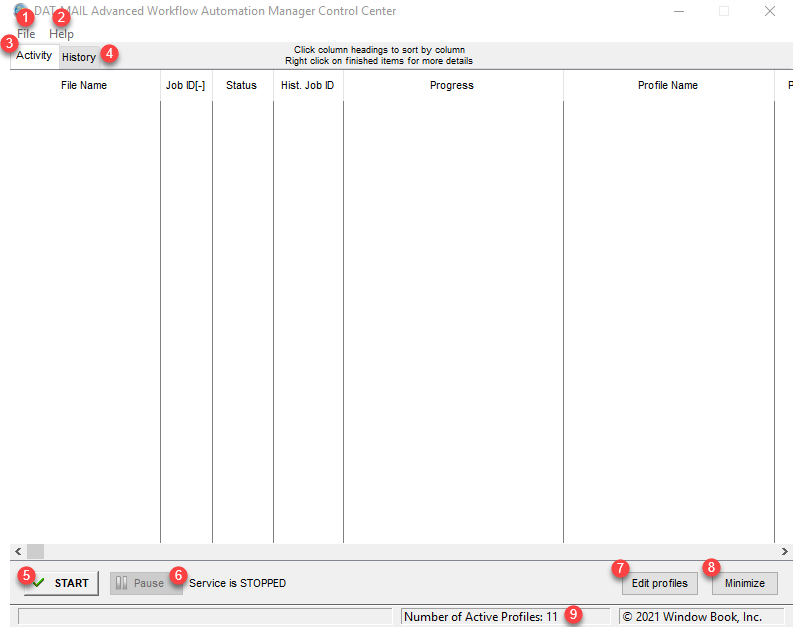
The Control Center consists of the following features:

Unless otherwise stated, it is assumed that the features or functions documented in this section are available in both server and workstation installations of the Control Center.
![]() File Menu: From this menu, you can select one of four options: Setup, Export Profiles, Import Profiles, or Exit.
File Menu: From this menu, you can select one of four options: Setup, Export Profiles, Import Profiles, or Exit.

-
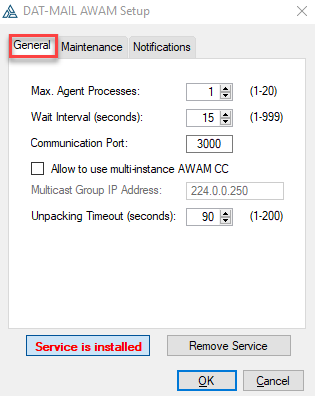
Setup: This option is only available on the server or stand-alone installations. It is not accessible on workstation installations of AWAM. Selecting this menu option displays the DAT-MAIL AWAM Setup window. Within this window are two control buttons used for installing and removing the AWAM Windows service (refer to the DAT-MAIL™- AWAM Setup for more information on installing the service). There are also three tabs in this window: General, Maintenance, and Notifications:

-
General: Within this tab, you can specify the maximum number of profiles that can run simultaneously, how often the service checks the appropriate import folders for incoming Mail.dat files, and control what communication port the service uses.
-
Maintenance: From within this tab is the ability to manage the number of CMD files stored in the Processed and Failed folders ( ‘c:\wb\MDV\data\AWAMCMDFiles’) to help with the maintenance of disk space on the server; as well as machine performance. Auto-deletion of these CMD files occurs daily by the system and any time the AWAM service is started. Files that are older than the specified date are deleted. Ten (10) days is the default setting. To purge all CMD files located in these two folders (including ones newer than the specified date), click Delete Processed CMD Files.

To also help maintain disk space, you can set up AWAM to automatically delete the Log Records created during processing that are older than a specified number of days (default is seven (7) days).
-
Notifications: You can activate email notifications for both successful completion and failed attempts of the AWAM processes from this tab. Select the corresponding checkbox (Success or Failure) and enter the recipient’s email address. Multiple email addresses can be entered by separating the addresses with a semi-colon.

Depending upon the number of AWAM processes that run each day, the number of emails received if ‘Notify on Success’ is enabled could be overwhelming for the recipients.
To ensure delivery of system-generated notifications, it is important for Clients to white-list the pertinent Window Book send-from email addresses on their server(s). A list of these email addresses can be found on the Window Book website at: https://www.windowbook.com/home/White-List-Help.
The subject line of the Successful email will provide the Job ID, Job No., the status of the AWAM process, and the name of the server the process ran. The body of the emails will provide what type of process was run (import, merge, post process), what profile was used for the process, a date/time stamp, the Job ID (for a merge, the job ID is for the newly created Mail.dat ), the Job No., the Job Description (Job Name), and the name of the Mail.dat file.
The Failed email notification will provide a status notification in the Subject line and the associated server name. The email will also contain information about the errors that caused it to abort and where the associated file is located on the server or a stand-alone.
-
-
Export Profiles: This option allows you to export your existing profiles into a single, zipped file for backup purposes (refer to AWAM - Exporting Profiles for more information);
-
Import Profiles: This option allows you to import previously exported profiles into AWAM (refer to AWAM - Importing Profiles for more information).
-
Exit: This option in the AWAM Control Center’s File menu shuts down the Control Center and unloads it from memory (refer to the AWAM - Minimizing vs. Exiting the Control Center for more information).
![]() Help menu: The functionality accessible via the Help menu is the same among server, stand-alone, and workstation installations of AWAM. All can see the Customer Info Screen. But the New Registration option is not available on workstation installations.
Help menu: The functionality accessible via the Help menu is the same among server, stand-alone, and workstation installations of AWAM. All can see the Customer Info Screen. But the New Registration option is not available on workstation installations.
