Other Programs > Manage PMOD Shipments - Managing All Types of PMOD Shipments
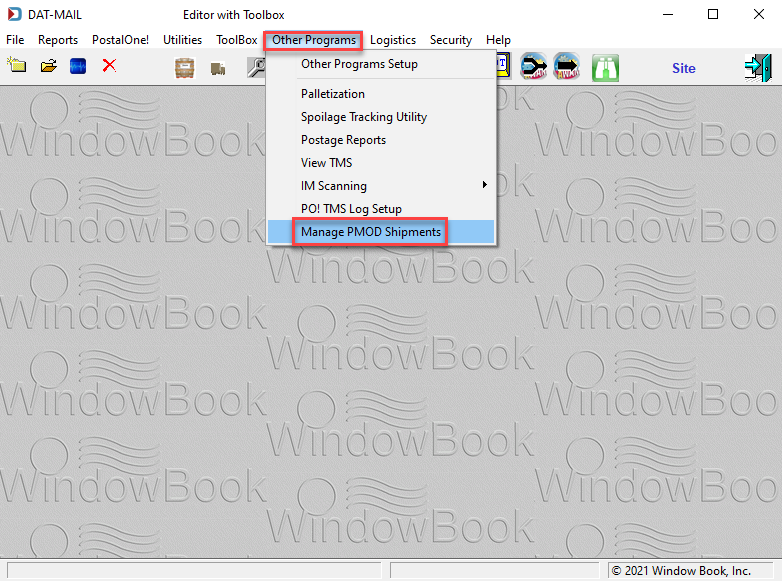
To manage all existing PMOD shipments from one central location, select Other Programs > Manage PMOD Shipments from the DAT-MAIL main screen.
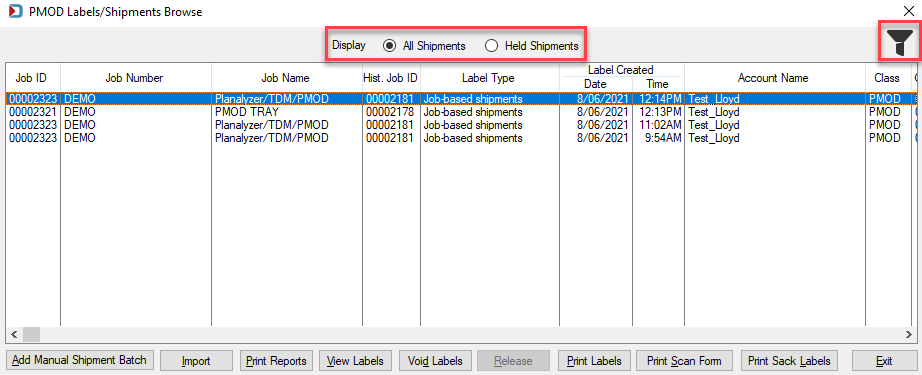
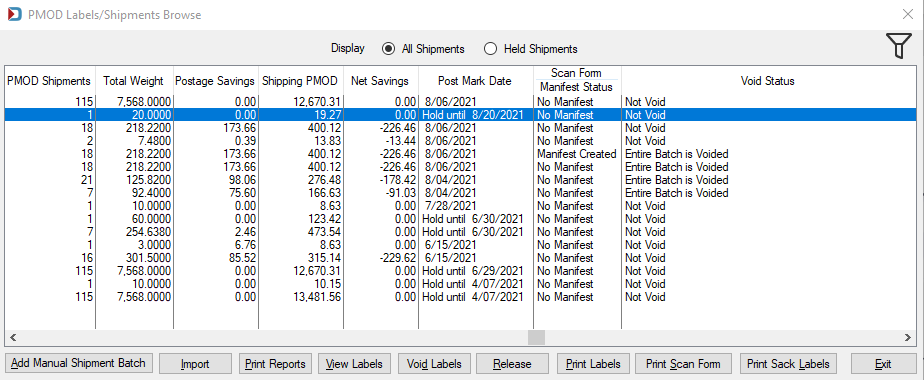
The PMOD Labels/Shipments Browse screen will display.
When the  filter icon is black, this means a filter is set. If you are missing a job, click on the filter to change or remove it. In this example, the filter is set to Today's Date. You can also toggle between All Shipments and Held Shipments.
Screen Columns
The screen displays all exiting PMOD shipments, including voided shipments, whether created from a Mail.dat, imported, or created manually by a user. In addition, the screen displays the following information for each PMOD shipment:
Job ID: This is the system-generated ID created by DAT-MAIL. When importing or creating a manual shipment, you can enter a value, but it is not required.
Job Number: This is the Licensed User Job Number. When importing or creating a manual shipment, you can enter a value, but it is not required.
Job Name:This is the HDR Job Name/Title & Issue field. When importing or creating a manual shipment, you can enter a value, but it is not required.
Hist Job ID (Historical Job ID): This is populated for Mail.dats only. After importing a job into DAT-MAIL, this field becomes what used to be the original Job ID in the Mail.dat HDR file.
Label Type: This is whether the label you created was within a Mail.dat (Job-based Shipments), manually created (Job-based shipments), or if you import a file (Imported Shipments).
Label Created Date: The date when PMOD labels were purchased.
Label Created Time: The time when PMOD labels were purchased.
Account Name: The account used to pay PMOD postage.
Class: This shows whether it is a PMOD or PMEOD shipment.
Origin Zip: This is your 5-digit facility zip.
Total Pieces: The total pieces shipping PMOD or PMEOD.
PMOD Shipments: The number of PMOD sacks or tray boxes created.
Total Weight: The total weight of the PMOD shipments.
Postage Savings: This will only show for PMOD shipments created from a Mail.dat.
Shipping PMOD: This is PMOD shipping cost.
Net Savings: This will only show for PMOD shipments created from a Mail.dat.
Post Mark Date: If you hold a shipment, this will show the date the Post Mark Date expires. For example, if a hold is put on a shipment on 8/8/21, it will show "Hold until 8/20/21."
Scan Form Manifest Status: This status indicates whether you have generated a Scan Form or not. If a Scan Form was generated, it will show "Manifest Created".
Void Status: This indicates if a shipment or batch is voided.
Screen Filter
The screen's filter function allows users to limit or control the PMOD shipments displayed using various criteria. The filter image changes based on whether a filter has been applied ( = No filter has been applied, or = Filter has been applied).
Click the Filter button to launch the Browse Filter List. Existing filters (if any) will display in the window.
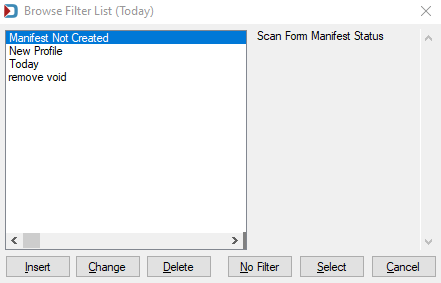
To apply an existing filter to the PMOD shipments list, highlight it in the list and click Select.
-
To create a new filter, click Insert.
-
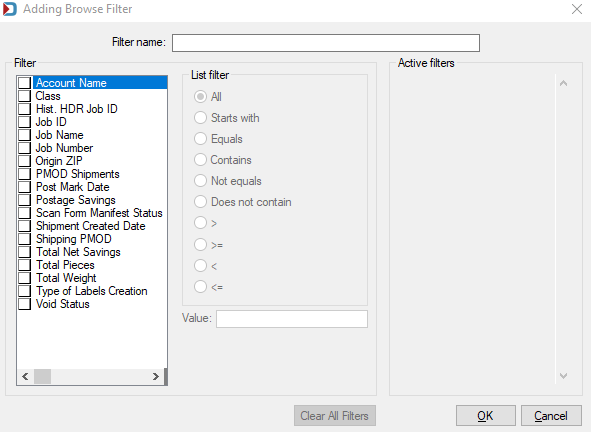
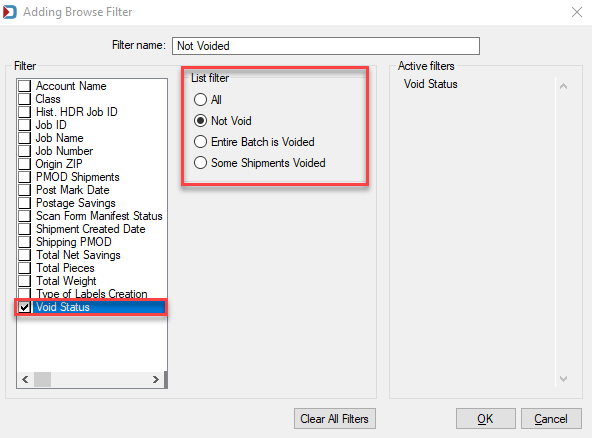
The Adding Browse Filter screen will display. Enter a name for the filter.
-
From the list of filter criteria on the left, select which options to use for filtering the existing PMOD shipments list. How each can be filtered shows on the right pane.
-
Click OK when finished to close the screen.
In the example here the “Not Voided” filter will only display those PMOD/PMEOD shipments that have a void status of “Not Void”.
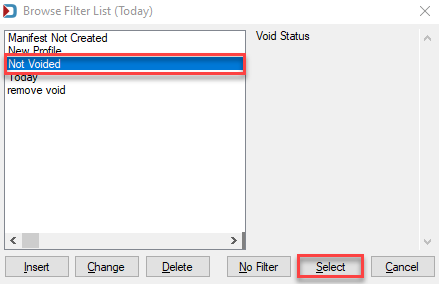
The Browse Filter List screen will update and display the newly created filter in the list. To apply the filter, select/highlight it and click Select.
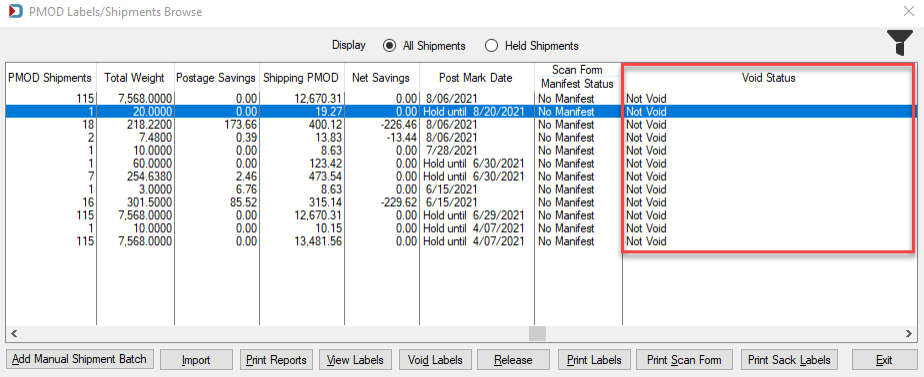
The Browse Filter List screen will close, and the PMOD Labels/Shipments Browse screen will update to display only those shipments with a Void Status of “Not Voided.”
To remove a filter from the shipment list, click Filter. The Browse Filter List screen will display. Next, click No Filter.
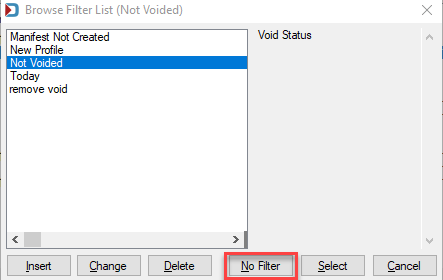
The Browse Filter List screen will automatically close. The PMOD Labels/Shipments Browse screen will update, showing that no filter has been applied and displaying all existing PMOD/PMEOD shipments.
Existing filters can be changed or modified by highlighting the filter in the list and click Change. Or existing filters can be deleted by highlighting the filter in the list and click Delete.
Screen Functions
Here we will cover what function each button performs.
Below the print screen is an explanation:
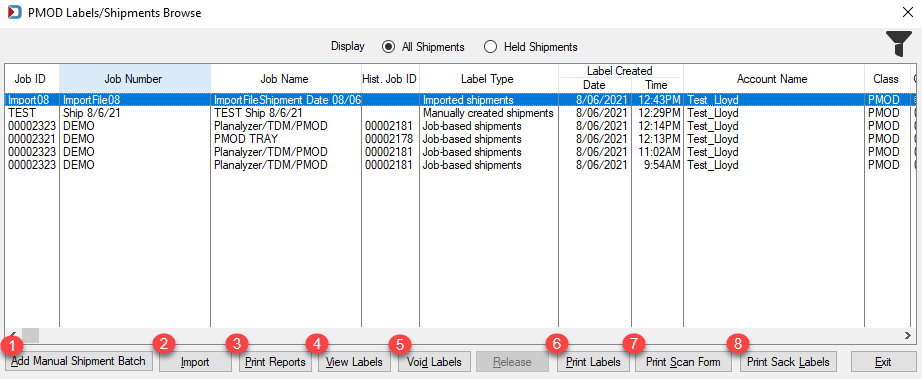
![]() Add Manual Shipments: Use this function to create PMOD or PMEOD shipments manually. Refer to Other Programs > Manage PMOD Shipments - Create Shipments Manually for more information.
Add Manual Shipments: Use this function to create PMOD or PMEOD shipments manually. Refer to Other Programs > Manage PMOD Shipments - Create Shipments Manually for more information.
![]() Import: This function allows you to import a file of PMOD shipments. The file must be a fixed format file and the fields must be in the correct positions! Refer to Other Programs > Manage PMOD Shipments - Create Shipments From Imported File for instructions.
Import: This function allows you to import a file of PMOD shipments. The file must be a fixed format file and the fields must be in the correct positions! Refer to Other Programs > Manage PMOD Shipments - Create Shipments From Imported File for instructions.
Be aware that labels are automatically purchased when a file is imported using this feature!
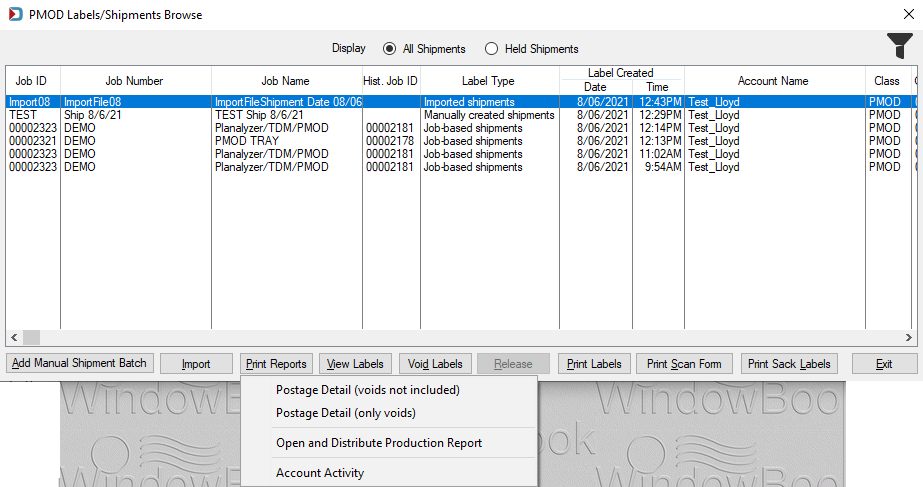
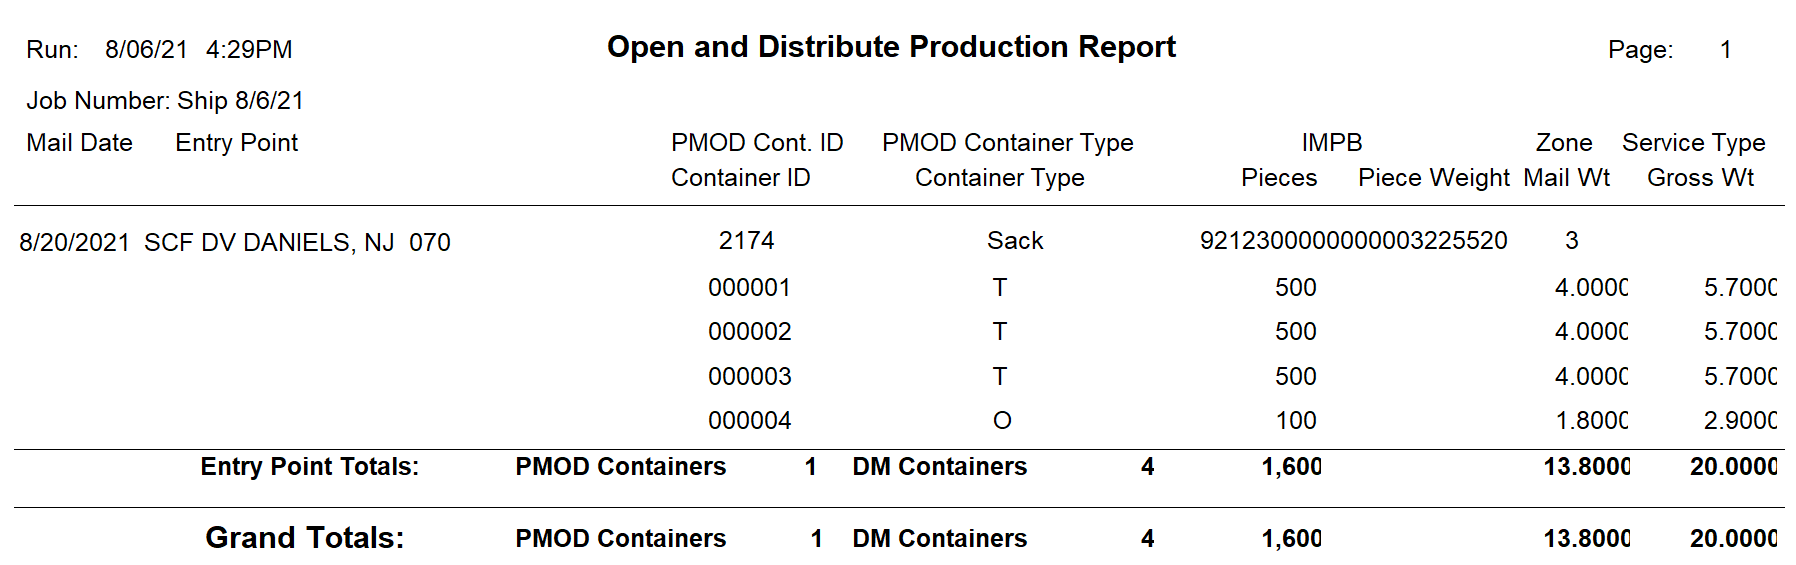
![]() Print Reports: Use this function to generate any of the four report options: Postage Details (voids not included), Postage Detail (only voids), Open & Distribute Production Report, and Account Activity.
Print Reports: Use this function to generate any of the four report options: Postage Details (voids not included), Postage Detail (only voids), Open & Distribute Production Report, and Account Activity.
The data provided by the reports is for ALL shipments (both PMOD and PMEOD). The data included can be limited by a date range specified by the user. For more information about these individual reports, refer to PMOD - Reports.
![]() View Labels: this function lets you view the labels for individual shipments in a selected batch. The next screen to display depends on how the shipment was created – in a Mail.dat, manually entered, or imported. For example, if the batch shipment was created from a Mail.dat, the PMOD Shipment Estimates screen would display. If the batch shipment was created manually or by importing a file, the PMOD Shipments screen would display.
View Labels: this function lets you view the labels for individual shipments in a selected batch. The next screen to display depends on how the shipment was created – in a Mail.dat, manually entered, or imported. For example, if the batch shipment was created from a Mail.dat, the PMOD Shipment Estimates screen would display. If the batch shipment was created manually or by importing a file, the PMOD Shipments screen would display.
From the PMOD Estimates screen, use View Shipments to view/void/print individual labels for shipments.
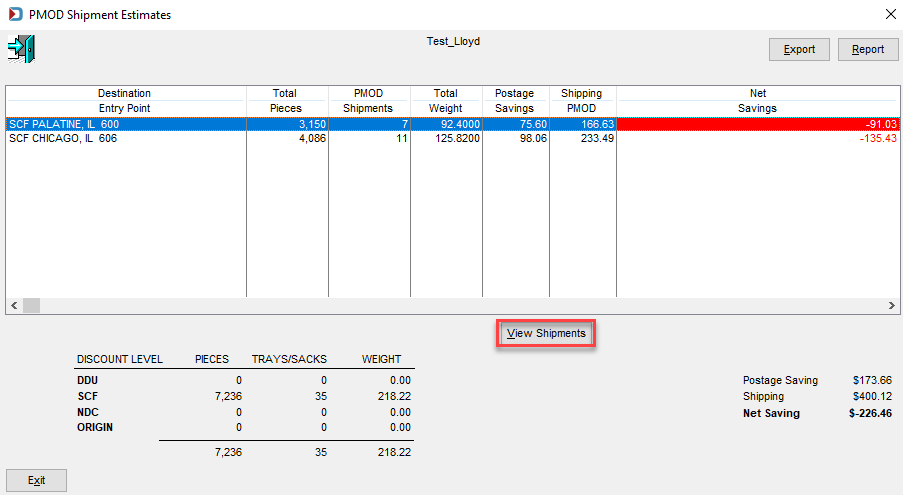
For more information, refer to Transportation View - PMOD - Create Shipments from Mail.dat.
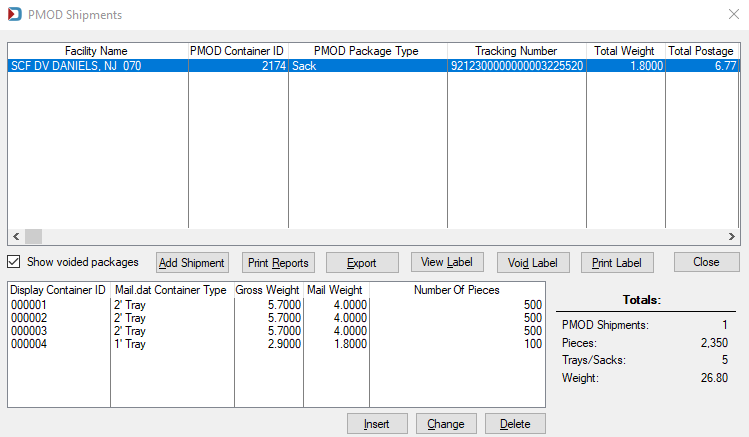
From the PMOD Shipments screen, you can see each PMOD sack, which can be highlighted to view, void or print.
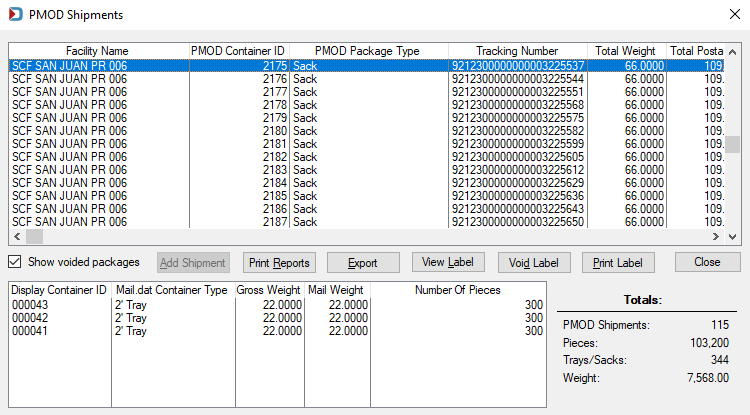
Add Trays, Sacks, or Tubs
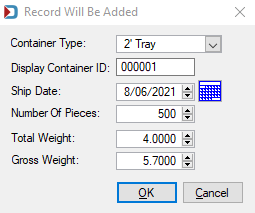
If you want to create the Open & Distribute Production Report for a manual shipment, you need to insert Trays or Sacks. In this example, it is a First Class Letter mailing. At the bottom of the PMOD Shipments screen, click Insert and when the Record Will Be Added displays, enter in the tray information. To determine Gross Weight, you need to know the tare weight of the tray, sack or tub.
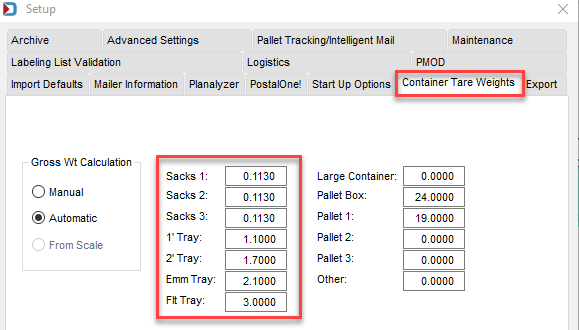
If you have not adjusted the tare weights in the Setup screen, these are the tare weights of each container type.
![]() Void Labels: This function is to void labels for an entire batch shipment, manual shipment, or imported shipment all at once. Highlight the shipment in the PMOD Labels/Shipments Browse list and click Void Labels.
Void Labels: This function is to void labels for an entire batch shipment, manual shipment, or imported shipment all at once. Highlight the shipment in the PMOD Labels/Shipments Browse list and click Void Labels.
![]() Print Labels: This function is intended for printing all the labels for a batch shipment at once. Highlight the desired batch or shipment in the list and click Print Labels.
Print Labels: This function is intended for printing all the labels for a batch shipment at once. Highlight the desired batch or shipment in the list and click Print Labels.
If an error dialog displays informing the use that a PMOD Label Printer is not specified in DAT-MAIL Setup, click OK to close the dialog. Next, exit the PMOD Labels/Shipments Browse screen and close the job. Then in the DAT-MAIL main screen, go to File > Program Settings, Program Setup. When the Setup screen opens, click the PMOD tab, and specify a label printer (refer to Setup - PMOD Tab - Provider Registration (Required)).
![]() Print Scan Form: This function generates and prints a PS Form 5830, used for shipment confirmation and acceptance. The form displays the number of PMOD or PMEOD shipments and contains a single EFN barcode or manifest ID that identifies and links each shipment for all entry points that make up a batch. You do not have to print a PS Form 5830 for each shipment in a batch. Instead, the scan form consolidates all shipments under one EFN barcode or manifest ID. Using this function requires a Scan Form Printer setup in the Setup screen in DAT-MAIL; specifically, the PMOD tab (refer to PMOD Setup - PMOD Tab for instructions).
Print Scan Form: This function generates and prints a PS Form 5830, used for shipment confirmation and acceptance. The form displays the number of PMOD or PMEOD shipments and contains a single EFN barcode or manifest ID that identifies and links each shipment for all entry points that make up a batch. You do not have to print a PS Form 5830 for each shipment in a batch. Instead, the scan form consolidates all shipments under one EFN barcode or manifest ID. Using this function requires a Scan Form Printer setup in the Setup screen in DAT-MAIL; specifically, the PMOD tab (refer to PMOD Setup - PMOD Tab for instructions).
-
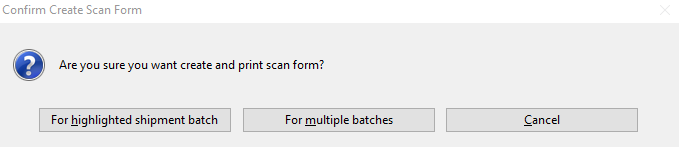
Creating a Scan Form for multiple shipments is different than creating a Scan Form for one batch or shipment. When you click on Print Scan Form and the Confirm Create Scan Form dialog will appear. Click For multiple batches.
-
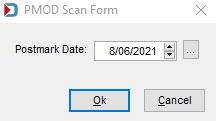
When the PMOD Scan Form window appears, the Postmark Date defaults to today or the computer’s system date. Click OK.
-
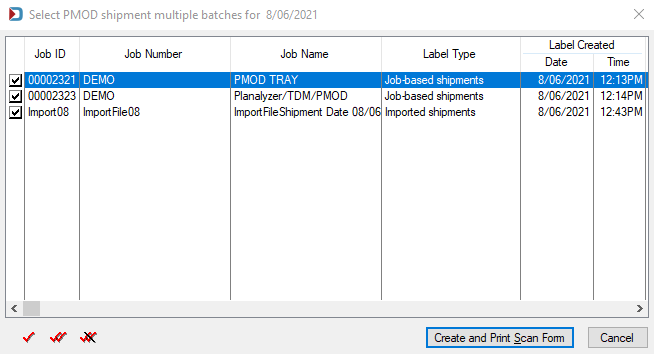
Another window will appear listing the jobs that have PMOD shipments with this Postmark Date. Click Create and Print Scan Form to see the Scan Form.
-
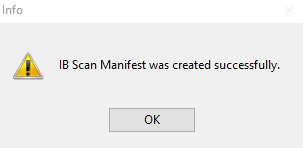
Once you preview it, you can save or print the form. Next, close the preview window, and an Info dialog will appear; click OK.
-
You will be returned to the PMOD Labels/Shipments Browse window. Once you are done, click Exit.
Once a scan form is generated for multiple batches, those batches are linked to that scan form. So, if you need to reprint a scan form created for various batches, only one of the shipments in the batch needs to be highlighted, and then click Reprint Scan Form.
![]() Print Sack Labels: This function is used to print the PMOD Sack tags. To print sack labels, select the batch or shipment and click Print Sack Labels.
Print Sack Labels: This function is used to print the PMOD Sack tags. To print sack labels, select the batch or shipment and click Print Sack Labels.
For more information on step-by-step instructions for the functions above that were not covered in detail, please refer to Transportation View - Managing PMOD Shipments.
Continue PMOD - Reports